Create Custom Widgets in jQuery and Knockout
When do you need a custom widget?
There are two main scenarios when you want to create a new Custom Widget. You want to modify, extend the behavior of the existing question(s), or you want to create a new question, typically using an existing third-party JavaScript widget/library.
If you want to change the standard question UI, then it is better to modify CSS classes or use SurveyJS events, for example survey.onAfterRenderQuestion event.
We have several built-in custom widgets, that we have created for you. Please note, we are using third-party libraries. If there is a bug or you need a new functionality from a third-party library, that we use in our custom widget, then please contact authors of these libraries. View the 'surveyjs-widgets' library source code on GitHub
Create simple custom widget
Add functionality into existing question.
Let us create a very simple custom widget that will add additional functionality into Comment Question, html text area. We want to search for a text in the text area and in case we found the text, focus the text area and select the text we found. We will add text input and “Search” button. If a user clicks the Search button the second time, it will work as “Search Next”.
var searchStringWidget = {
    //the widget name. It should be unique and written in lowercase.
    name: "searchstring",
    //SurveyJS library calls this function for every question to check
    //if this widget should apply to the particular question.
    isFit: function (question) {
        //We are going to apply this widget for comment questions (textarea)
        return question.getType() == "comment";
    },
    //We will change the default rendering, but do not override it completely
    isDefaultRender: true,
    //"question" parameter is the question we are working with and "el" parameter is HTML textarea in our case
    afterRender: function (question, el) {
        //Create a div with an input text and a button inside
        var mainDiv = document.createElement("div");
        var searchEl = document.createElement("input");
        searchEl.style.width = "calc(100% - 120px)";
        var btnEl = document.createElement("button");
        btnEl.innerText = "Search";
        btnEl.style.width = "120px";
        var searchIndex = 0;
        //Start searching from the beginning on changing the search text
        searchEl.onchange = function () {
            searchIndex = 0;
        };
        //Do the search on button click
        btnEl.onclick = function () {
            var searchText = searchEl.value;
            var text = el.value;
            //Do nothing if search text or textarea is empty
            if (!searchText || !text) return;
            var index = text.indexOf(searchText, searchIndex + 1);
            //If nothing found, but started not from the beginning then start from the beginning
            if (index < 0 && searchIndex > -1) {
                index = text.indexOf(searchText, 0);
            }
            searchIndex = index;
            //If found the text then focus the textarea and select the search text.
            if (index > -1) {
                el.focus();
                el.setSelectionRange(index, index + searchText.length);
            }
        };
        mainDiv.appendChild(searchEl);
        mainDiv.appendChild(btnEl);
        //Append the div with search input and button before textarea
        el.parentElement.insertBefore(mainDiv, el);
    },
};

//Register our widget in singleton custom widget collection
Survey.CustomWidgetCollection.Instance.add(searchStringWidget);
As you can see in the code, we are setting just two properties and two functions.
The first property is name. This property should be unique and in lowercase.
The second property is isDefaultRender. It is an optional property, you have to set it to true, if you want the default question input rendering. We do not want to render html “textarea” element by ourselves and we don’t want to setup question value binding, so we set this property to “true”.
The first function is isFit(). It has a question as a parameter, and it should return true if we want to apply our widget for this question. We are returning true for comment questions. Please note: SurveyJS allows to apply only one custom widget for a question. If there is several custom widgets that can apply to the same question then the first custom widget in the custom widget collection wins.
The second and main function is afterRender(). It has two parameters: a question and its input DOM element. In our case the input DOM element is text area. We are dynamically adding input text and search button under the text area and writing the code on button click that does the actual search.
Add a new property in existing question.
In the previous example we added the search functionality into Comment question. It applies to all comment questions. Now, let us add a boolean property “hasSearch” that will turn this functionality on and off.
//SurveyJS calls it right after adding a new widget into custom widget collection.
//You can add here new classes and properties or modify/delete the existing.
init() {
  //Add a boolean property hasSearch into comment question.
  //Use switch property editor for it.
  //you can have a simple check property editor by changing ":switch" to ":boolean"
  //Add it to general category
  Survey.Serializer.addProperty("comment", {
    name: "hasSearch:switch",
    //default: true, //uncomment this line to make this property true, search functionality is on, by default.
    category: "general",
  });
},
//Add a check for hasSearch property in the beginning.
afterRender: function (question, el) {
    //property hasSearch is false. SurveyJS Creator user doesn't want search functionality for this question.
    if (!question.hasSearch) return;
    ...
}
You have to use init() function for adding new classes and properties. Additionally you have to modify afterRender() function and do nothing if hasSearch property is not true.
The following code works perfectly in general. The only problem, if this property is changed in run-time or in designer, the end-user will not see changes in UI. To make the better user experience in SurveyJS Creator, we must render our search panel all the time but hide/show it on changing the property.
We must change afterRender() function only. Remove the check on hasSearch property in the beginning and add the following code at the end:
//Show hide search panel on changing hasSearch property
afterRender: function (question, el) {
    //if (!question.hasSearch) return; remove this line
    ...
    //Hide the search panel/div if hasSearch is not true
    mainDiv.style.display = !question.hasSearch ? "none" : "";
    //On every hasSearch property changing call the anonym function
    question.registerFunctionOnPropertyValueChanged("hasSearch",
        function () {
            mainDiv.style.display = !question.hasSearch ? "none" : "";
    });
}
Here is what we get as result.
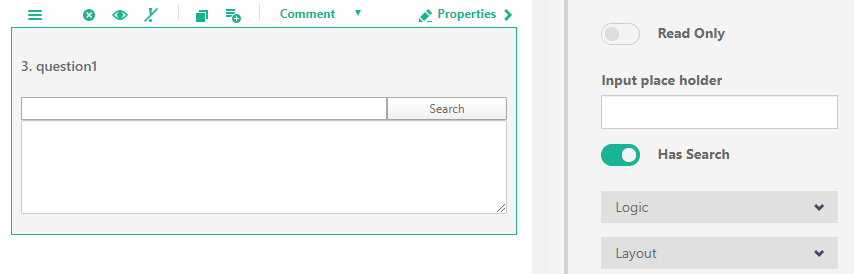
Search String Widget
And here is the full widget script
var searchStringWidget = {
  name: "searchstring",
  isFit: function (question) {
    return question.getType() == "comment";
  },
  init() {
    Survey.Serializer.addProperty("comment", {
      name: "hasSearch:switch",
      category: "general",
    });
  },
  isDefaultRender: true,
  afterRender: function (question, el) {
    var mainDiv = document.createElement("div");
    var searchEl = document.createElement("input");
    searchEl.style.width = "calc(100% - 120px)";
    var btnEl = document.createElement("button");
    btnEl.innerText = "Search";
    btnEl.style.width = "120px";
    var searchIndex = 0;
    searchEl.onchange = function () {
      searchIndex = 0;
    };
    btnEl.onclick = function () {
      var searchText = searchEl.value;
      var text = el.value;
      if (!searchText || !text) return;
      var index = text.indexOf(searchText, searchIndex + 1);
      if (index < 0 && searchIndex > -1) {
        index = text.indexOf(searchText, 0);
      }
      searchIndex = index;
      if (index > -1) {
        el.focus();
        el.setSelectionRange(index, index + searchText.length);
      }
    };
    mainDiv.appendChild(searchEl);
    mainDiv.appendChild(btnEl);
    el.parentElement.insertBefore(mainDiv, el);

    mainDiv.style.display = !question.hasSearch ? "none" : "";
    question.registerFunctionOnPropertyValueChanged(
      "hasSearch",
      function () {
        mainDiv.style.display = !question.hasSearch ? "none" : "";
      }
    );
  },
};

Survey.CustomWidgetCollection.Instance.add(
  searchStringWidget
);
Add new question using custom widget.
Here we will create a very simple rich editor, using on content editable feature. We can use a third-party rich editor here, but for simplicity we will use a simple div element and several buttons as toolbar items.
var richEditWidget = {
  //the widget name. It should be unique and written in lowercase.
  name: "richedit",
  //This title will be displayed on SurveyJS Creator toolbox
  title: "Rich Editor",
  //Icon that displays on SurveyJS Creator toolbox
  //You can leave this property empty to show the default icon
  iconName: "icon-editor",
  //It is a required function for a custom type widget, that user can see on toolbox
  //Commonly you check here, that all scripts/css files are loaded on the page
  widgetIsLoaded: function () {
    return true; //We do not have external scripts
    //return typeof $ == "function"; //example of checking on loading jQuery
  },
  //Applies for a question that has our own type
  isFit: function (question) {
    return question.getType() == "richedit";
  },
  init() {
    //Register a new type using the empty question as the base.
    Survey.Serializer.addClass("richedit", [], null, "empty");
  },
  //We do not need default rendering here.
  //SurveyJS will render this template by default
  htmlTemplate:
    '<div>\
    <div>\
      <button onclick="document.execCommand(\'bold\')">Bold</a>\
      <button onclick="document.execCommand(\'italic\')">Italic</a>\
      <button onclick="document.execCommand(\'insertunorderedlist\')">List</a>\
    </div>\
    <div class="widget_rich_editor" contenteditable=true style="height:200px"></div>\
  </div>',
  //Our element will be rendered base on template.
  //We do not need to do anything here
  afterRender: function (question, el) {}
};

//Register our widget in singleton custom widget collection and tells that, it is a new "customtype".
//We require this value for the second parameter if we want to show our custom widget as q new question in SurveyJS Creator toolbox
Survey.CustomWidgetCollection.Instance.add(
  richEditWidget,
  "customtype"
);
It works at the first look, but unfortunately, the after end-user enters the value, it is not shown in the survey result. We did not bind our editor value into question value. We will need to modify the afterRender() function code.
afterRender: function (question, el) {
  //Find the editor div by css class
  var editor = el.getElementsByClassName("widget_rich_editor");
  if (editor.length == 0) return;
  editor = editor[0];
  //Implement two way bindings el.innerHTML vs question.value
  //Set the initial value
  editor.innerHTML = question.value || "";
  //Update the question value on changing editor content
  var changingValue = false;
  var updateQuestionValue = function () {
    if (changingValue) return;
    changingValue = true;
    question.value = editor.innerHTML;
    changingValue = false;
  };
  if (editor.addEventListener) {
    var types = [
      "input",
      "DOMNodeInserted",
      "DOMNodeRemoved",
      "DOMCharacterDataModified",
    ];
    for (var i = 0; i < types.length; i++) {
      editor.addEventListener(types[i], updateQuestionValue, false);
    }
  }
  //If the question value changes in run-time, update the value
  question.valueChangedCallback = function () {
    if (changingValue) return;
    changingValue = true;
    editor.innerHTML = question.value || "";
    changingValue = false;
  };
},
The code looks a little overcomplicated. If we do not use document execCommand function, then we could use div onBlur event. Commonly the code is simpler.
Here is the example for CK_Editor custom widget.
...
var isValueChanging = false;
var updateValueHandler = function () {
  if (isValueChanging || typeof question.value === "undefined") return;
  editor.setData(question.value);
};
editor.on("change", function () {
  isValueChanging = true;
  question.value = editor.getData();
  isValueChanging = false;
});

question.valueChangedCallback = updateValueHandler;
updateValueHandler();
...
The last step is to react on changing the enable/disable question state. We must add this code into afterRender() function as well. We will have to enable/disable toolbar items and change the property contenteditable from true to false and back.
afterRender: function (question, el) {
  ...
  //Enable/disable toolbar and editor
  var updateReadOnly = function () {
    var enabled = !question.isReadOnly;
    //Turn on/off contenteditable attribute
    editor.setAttribute("contenteditable", enabled ? "true" : "false");
    var buttons = el.getElementsByTagName("button");
    //Disable/enables all toolbar buttons
    for (var i = 0; i < buttons.length; i++) {
      buttons[i].disabled = !enabled;
    }
  };
  //Set initial read-only state
  updateReadOnly();
  //Update editor read-only state on changing question readOnly property
  question.readOnlyChangedCallback = function () {
    updateReadOnly();
  };
},
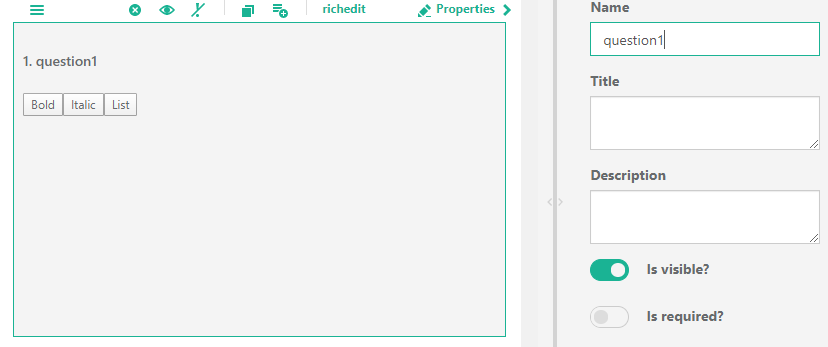
Rich Edit Widget
Here is the full widget script
var richEditWidget = {
  name: "richedit",
  title: "Rich Editor",
  iconName: "icon-editor",
  widgetIsLoaded: function () {
    return true; //We do not have external scripts
  },
  isFit: function (question) {
    return question.getType() == "richedit";
  },
  init() {
    Survey.Serializer.addClass("richedit", [], null, "empty");
  },
  htmlTemplate:
    '<div>\
    <div>\
      <button onclick="document.execCommand(\'bold\')">Bold</a>\
      <button onclick="document.execCommand(\'italic\')">Italic</a>\
      <button onclick="document.execCommand(\'insertunorderedlist\')">List</a>\
    </div>\
    <div class="widget_rich_editor" contenteditable=true style="height:200px"></div>\
  </div>',
  afterRender: function (question, el) {
    var editor = el.getElementsByClassName("widget_rich_editor");
    if (editor.length == 0) return;
    editor = editor[0];
    editor.innerHTML = question.value || "";
    var changingValue = false;
    var updateQuestionValue = function () {
      if (changingValue) return;
      changingValue = true;
      question.value = editor.innerHTML;
      changingValue = false;
    };
    if (editor.addEventListener) {
      var types = [
        "input",
        "DOMNodeInserted",
        "DOMNodeRemoved",
        "DOMCharacterDataModified",
      ];
      for (var i = 0; i < types.length; i++) {
        editor.addEventListener(types[i], updateQuestionValue, false);
      }
    }
    question.valueChangedCallback = function () {
      if (changingValue) return;
      changingValue = true;
      editor.innerHTML = question.value || "";
      changingValue = false;
    };
    var updateReadOnly = function () {
      var enabled = !question.isReadOnly;
      var buttons = el.getElementsByTagName("button");
      for (var i = 0; i < buttons.length; i++) {
      }
    };
    updateReadOnly();
    question.readOnlyChangedCallback = function () {
      updateReadOnly();
    };
  },
};

Survey.CustomWidgetCollection.Instance.add(
  richEditWidget,
  "customtype"
);
Totally replace the existing question input by custom widget.
Here we will use the code from rich edit custom widget, slightly modify it and show how to replace the existing question input with your own. In this example, we will replace the text area html element for comment question with our own html elements.
var richCommentWidget = {
  //the widget name. It should be unique and written in lowercase.
  name: "richcomment",
  //It will apply for all comment question type
  isFit: function (question) {
    return question.getType() == "comment";
  },
  init() {
    //Hide some properties in comment question
    Survey.Serializer.findProperty(
      "comment",
      "placeholder"
    ).visible = false;
    Survey.Serializer.findProperty("comment", "cols").visible = false;
    Survey.Serializer.findProperty("comment", "rows").visible = false;
  },
...
//template and afterRender are the same as in richEditWidget
};

//Register our widget in singleton custom widget collection
//We have to remove the second parameter that used for registration in SurveyJS Creator Toolbox
Survey.CustomWidgetCollection.Instance.add(richCommentWidget);
Now, on dropping the comment question, end-user will see our custom widget.
Custom widget API
var customWidgetJSON = {
  /**
   * Required attribute. Unique name in lower case.
   */
  name: "yourcomponentname",
  /**
   * Optional attribute. Toolbox use this value to display it as a text in toolbox item.
   * If it is empty, then name is used.
   */
  title: title,
  /**
   * Optional attribute. If Toolbox has several categories then
   * this attribute defines to which category this custom widget belongs.
   */
  category: category,
  /**
   * Optional attribute. Toolbox use it to show the icon type in toolbox item.
   * If it is empty, then Creator uses "icon-default" value.
   */
  iconName: iconName,
  /**
   * This function is required if you are going to introduce a new question type
   * and register it on SurveyJS Creator toolbox.
   * It should return true, when all needed resources (javascript and css files) are loaded
   */
  widgetIsLoaded: function () {
   return typeof $ == "function"; //example of checking on loading jQuery
  },
  /**
   * This function returns true when we decided to apply our widget to the question.
   * This function is required.
   * SurveyJS Library allows to apply only one custom widget to a question.
   * If there are several custom widgets that can be applied to the same question,
   * then the first custom widget in the custom widget collection wins.
   */
  isFit: function (question) {
     return question.getType() == "richedit";
  },
  /**
   * SurveyJS calls this function one time on registering the custom widget.
   * This function is optional
   */
  init: function() {
      //Add/modify/remove classes and properties
  },
  /**
   * If you want to have the default input rendering for the existing question, then set this property to true.
   */
  isDefaultRender: true,
  /**
   * SurveyJS will render this template for question input if this property is not empty.
   */
  htmlTemplate: "<input class='custom_class' />",
  /**
   * You have to put here code to modify the DOM, using the html element as a root element.
   * In case of creating your own question type,
   * you have to create data binding between your widget and question value.
   * If needed, react on changing read-only question state.
   */
  afterRender: function(question, element) {

  }
});

//leave this parameter empty or set it to "customtype" if you want to register a new item on SurveyJS Creator toolbox
var activatedByType = "customtype";
Survey.CustomWidgetCollection.Instance.add(customWidgetJSON, activatedByType);
Send feedback to the SurveyJS team
Need help? Visit our support page