Vue.js Form Library
SurveyJS Form Library for Vue.js is a client-side component that uses JSON objects to render dynamic forms in and Vue.js applications and send submission data to a database for storage. These JSON objects contain key-value pairs representing various aspects of a form, including descriptions of each form field, instructions on how to organize form fields on the page, and how the form should behave in response to user interactions, such as submitting data, validating input, and displaying error messages. By loading the JSON schemas that define form layout and content, the Form Library dynamically generates the corresponding HTML elements and renders them using native Vue rendering mechanism.
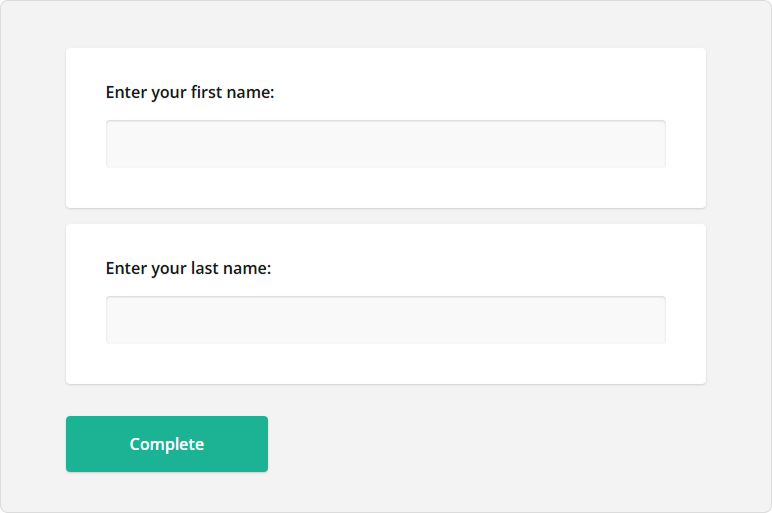
This step-by-step tutorial will help you get started with the SurveyJS Form Library in a Vue.js application. As a result, you will create a form displayed below:
View Live Example
If you are looking for a quick-start application that includes all SurveyJS components, refer to the following GitHub repository: SurveyJS + Vue 3 Quickstart Template.
Install the survey-vue3-ui npm Package
SurveyJS Form Library for Vue 3 consists of two npm packages: survey-core (platform-independent code) and survey-vue3-ui (rendering code). Run the following command to install survey-vue3-ui. The survey-core package will be installed automatically as a dependency.
npm install survey-vue3-ui --save
Configure Styles
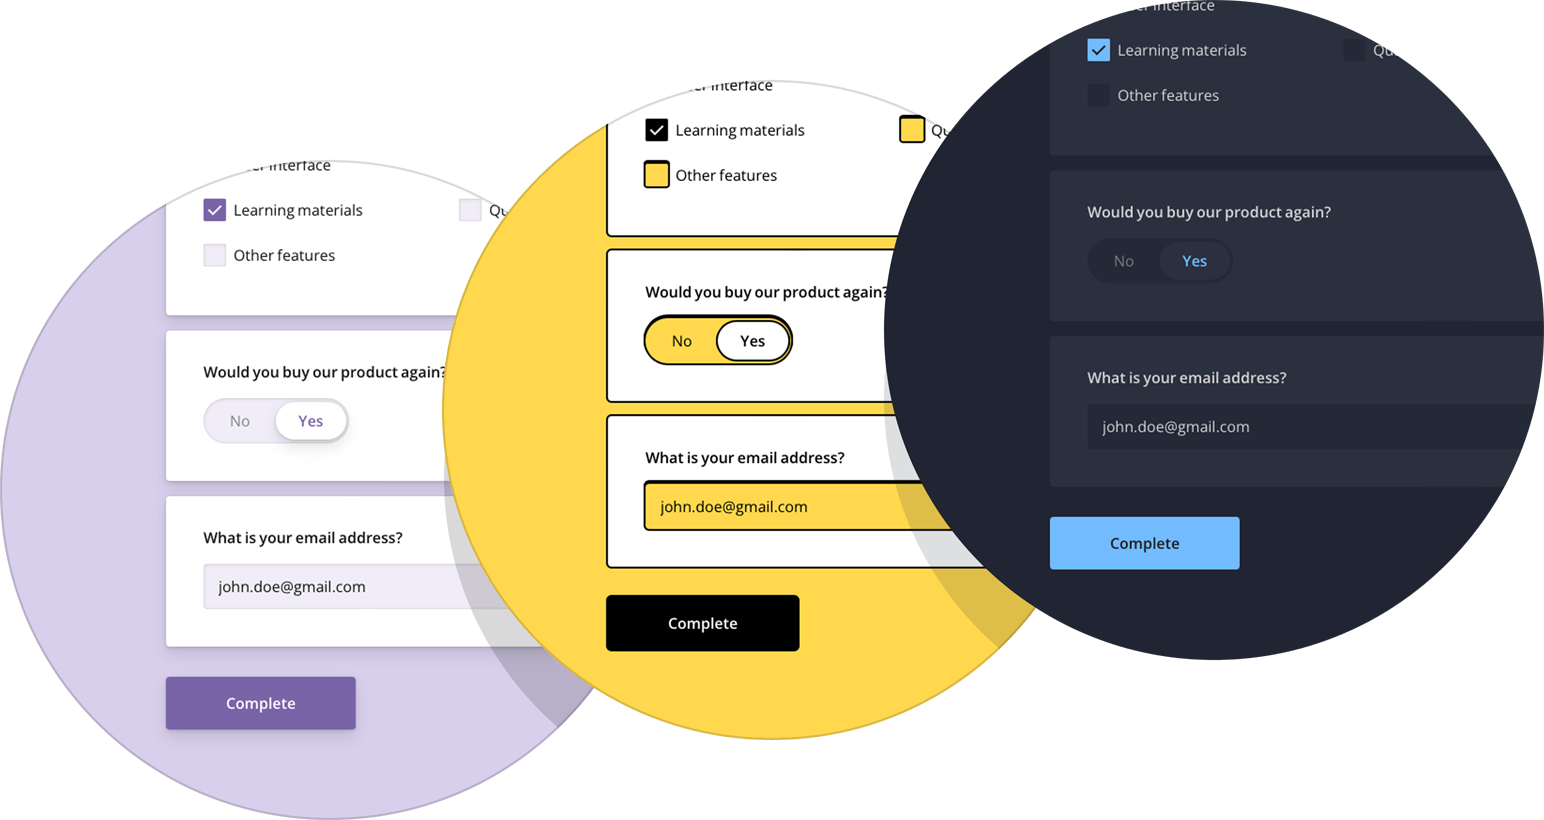
SurveyJS Form Library is shipped with several predefined themes illustrated below and a flexible theme customization mechanism based on CSS variables.
To add SurveyJS themes to your application, open the Vue component that will render your form and import the Form Library style sheet:
<script setup lang="ts">
import 'survey-core/survey-core.css';
</script>

<template>
  <!-- ... -->
</template>
This style sheet applies the Default theme. If you want to apply a different predefined theme or create a custom theme, refer to the following help topic for detailed instructions:
Create a Model
A model describes the layout and contents of your survey. The simplest form model contains one or several questions without layout modifications.
Models are specified by model schemas (JSON objects). For example, the following model schema declares two textual questions, each with a title and a name. Titles are displayed on screen. Names are used to identify the questions in code.
const surveyJson = {
  elements: [{
    name: "FirstName",
    title: "Enter your first name:",
    type: "text"
  }, {
    name: "LastName",
    title: "Enter your last name:",
    type: "text"
  }]
};
To instantiate a model, pass the model schema to the Model constructor as shown in the code below. The model instance will be later used to render the survey.
<script setup lang="ts">
// ...
import { Model } from 'survey-core';

const surveyJson = { ... };
const survey = new Model(surveyJson);
</script>

<template>
  <!-- ... -->
</template>
View Full Code
<script setup lang="ts">
import 'survey-core/survey-core.css';
import { Model } from 'survey-core';

const surveyJson = {
  elements: [{
    name: "FirstName",
    title: "Enter your first name:",
    type: "text"
  }, {
    name: "LastName",
    title: "Enter your last name:",
    type: "text"
  }]
};

const survey = new Model(surveyJson);
</script>

<template>
  <!-- ... -->
</template>
Render the Form
To render a survey, import SurveyComponent, add it to your template, and pass the model instance you created in the previous step to the component's model attribute:
<script setup lang="ts">
import { SurveyComponent } from 'survey-vue3-ui';
// ...
</script>

<template>
  <SurveyComponent :model="survey" />
</template>
The code above registers SurveyComponent locally. If you want to register it globally, open the main.ts file, import surveyPlugin, and install it using the app.use() method. In this case, you don't need to import SurveyComponent within each Vue component where you want to use it.
// main.ts
import { createApp } from 'vue'
import { surveyPlugin } from 'survey-vue3-ui'
import App from './App.vue'

createApp(App).use(surveyPlugin).mount('#app');
If you replicate the code correctly, you should see the following survey:
View Full Code
<script setup lang="ts">
import 'survey-core/survey-core.css';
import { Model } from 'survey-core';
import { SurveyComponent } from 'survey-vue3-ui';

const surveyJson = {
  elements: [{
    name: "FirstName",
    title: "Enter your first name:",
    type: "text"
  }, {
    name: "LastName",
    title: "Enter your last name:",
    type: "text"
  }]
};

const survey = new Model(surveyJson);
</script>

<template>
  <SurveyComponent :model="survey" />
</template>
Handle Form Completion
After a respondent completes a survey, the results are available within the onComplete event handler. In real-world applications, you should send the results to a server where they will be stored in a database and processed. If your application has a user identification system, you can add the user ID to the survey results before sending them to the server:
<script setup lang="ts">
// ...
const SURVEY_ID = 1;

const survey = new Model(surveyJson);
survey.onComplete.add(surveyComplete);

const surveyComplete = (survey: any) => {
  const userId = /* ... Getting the user ID ... */
  survey.setValue("userId", userId);

  saveSurveyResults(
    "https://your-web-service.com/" + SURVEY_ID,
    survey.data
  )
}

function saveSurveyResults(url: string | URL, json: object) {
  fetch(url, {
    method: 'POST',
    headers: {
      'Content-Type': 'application/json;charset=UTF-8'
    },
    body: JSON.stringify(json)
  })
  .then(response => {
    if (response.ok) {
      // Handle success
    } else {
      // Handle error
    }
  })
  .catch(error => {
    // Handle error
  });
}
</script>

<template>
  <!-- ... -->
</template>
In this tutorial, the results are simply output in an alert dialog:
<script setup lang="ts">
// ...
const survey = new Model(surveyJson);
survey.onComplete.add(alertResults);

const alertResults = (sender: any) => {
  const results = JSON.stringify(sender.data);
  alert(results);
}
</script>

<template>
  <!-- ... -->
</template>
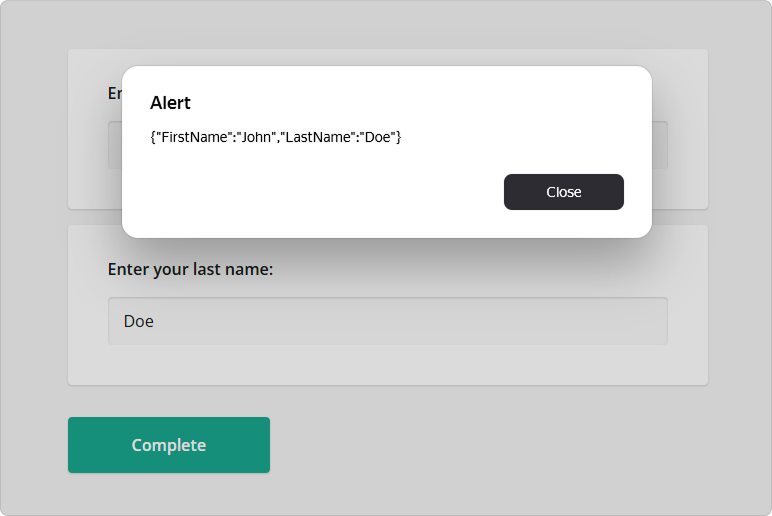
As you can see, form results are saved in a JSON object. Its properties correspond to the name property values of your questions in the model schema.
To view the application, run npm run dev in a command line and open http://localhost:5173/ in your browser.
View Full Code
<script setup lang="ts">
import 'survey-core/survey-core.css';
import { Model } from 'survey-core';
import { SurveyComponent } from 'survey-vue3-ui';

const surveyJson = {
  elements: [{
    name: "FirstName",
    title: "Enter your first name:",
    type: "text"
  }, {
    name: "LastName",
    title: "Enter your last name:",
    type: "text"
  }]
};

const alertResults = (sender: any) => {
  const results = JSON.stringify(sender.data);
  alert(results);
}

const survey = new Model(surveyJson);
survey.onComplete.add(alertResults);
</script>

<template>
  <SurveyComponent :model="survey" />
</template>
Further Reading
Send feedback to the SurveyJS team
Need help? Visit our support page