How to Sync a Range Slider with Input Fields
About the Range Slider Question
A Range Slider allows users to select a range of values (e.g., a minimum and maximum price) using a slider track with two thumbs (handles). It can be paired with two input fields to let users manually enter the minimum and maximum values.
When the Range Slider and input fields are synchronized, they update each other's values in real time. For example, dragging the slider thumbs updates the values in the input fields, and typing in the input fields adjusts the slider positions.
In this tutorial, we will focus on configuring a Range Slider question and synchronizing its values with two input fields for manual entry. Additionally, we will explain how to sync a Single-Value Slider with a single input field.
Sync a Range Slider with Input Fields
This section guides you through setting up a Range Slider and linking it to two Single-Line Input questions for manual value entry.
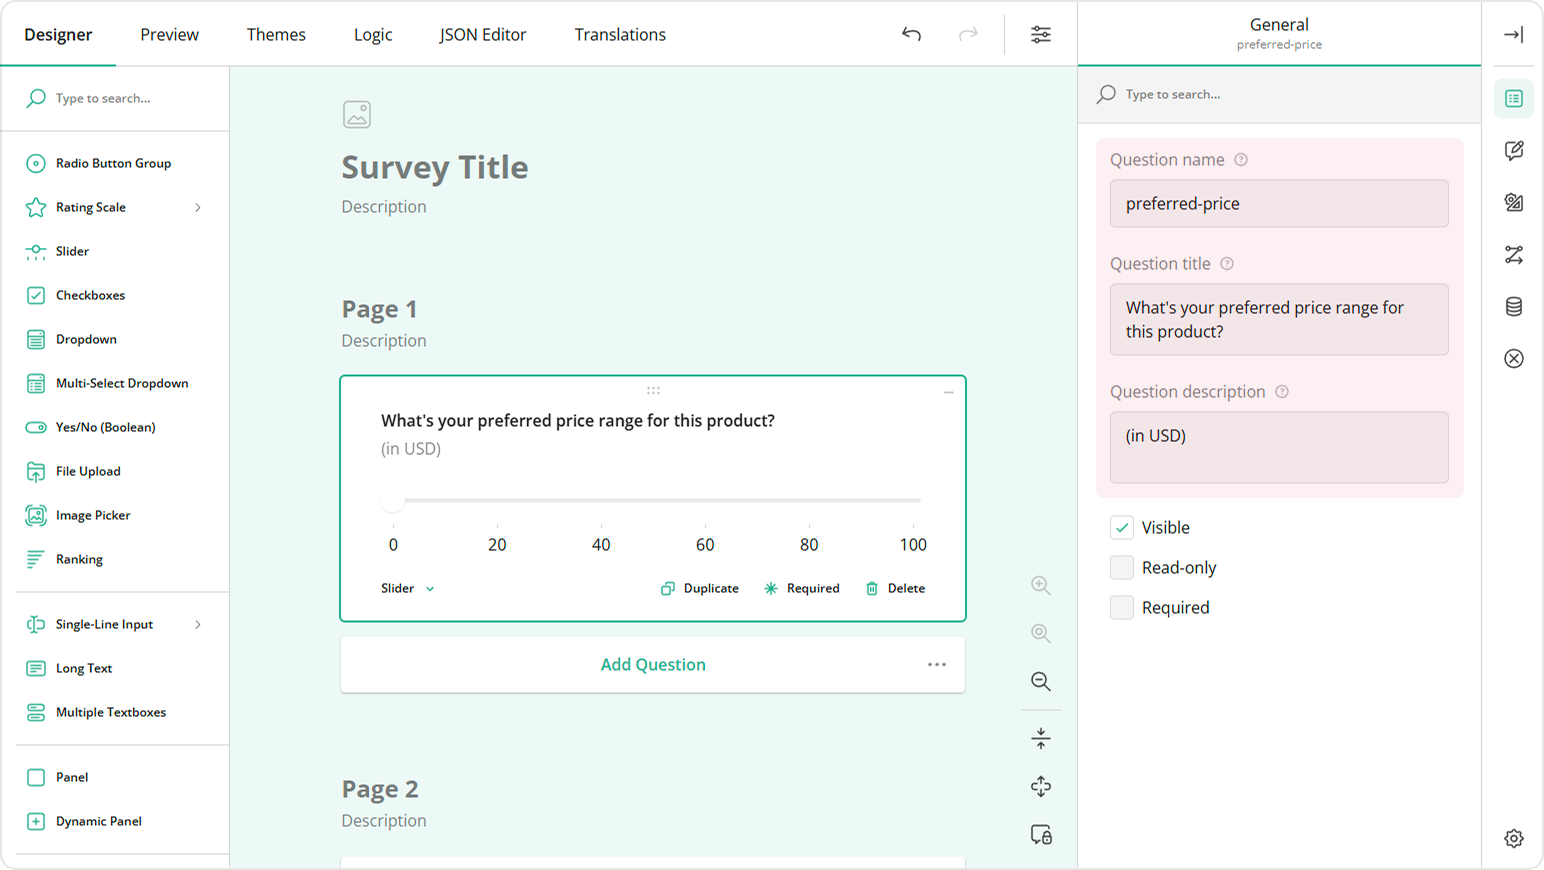
Add a Range Slider Question
- Drag a Slider question onto your form.
- Under General, give it a name (question ID, e.g.
preferred-price) and a user-friendly title (e.g.,What's your preferred price range for this product?). - Optionally, add a description (e.g.,
(in USD)).
Configure Range Slider Settings
Navigate to the Slider Settings category.
Set the Slider type property to Range to allow users to select a minimum and maximum value on the slider scale.
Adjust the scale limits using the Min value and Max value properties (e.g.,
100and1000).Modify the Step value to
10for increments such as110,120, etc.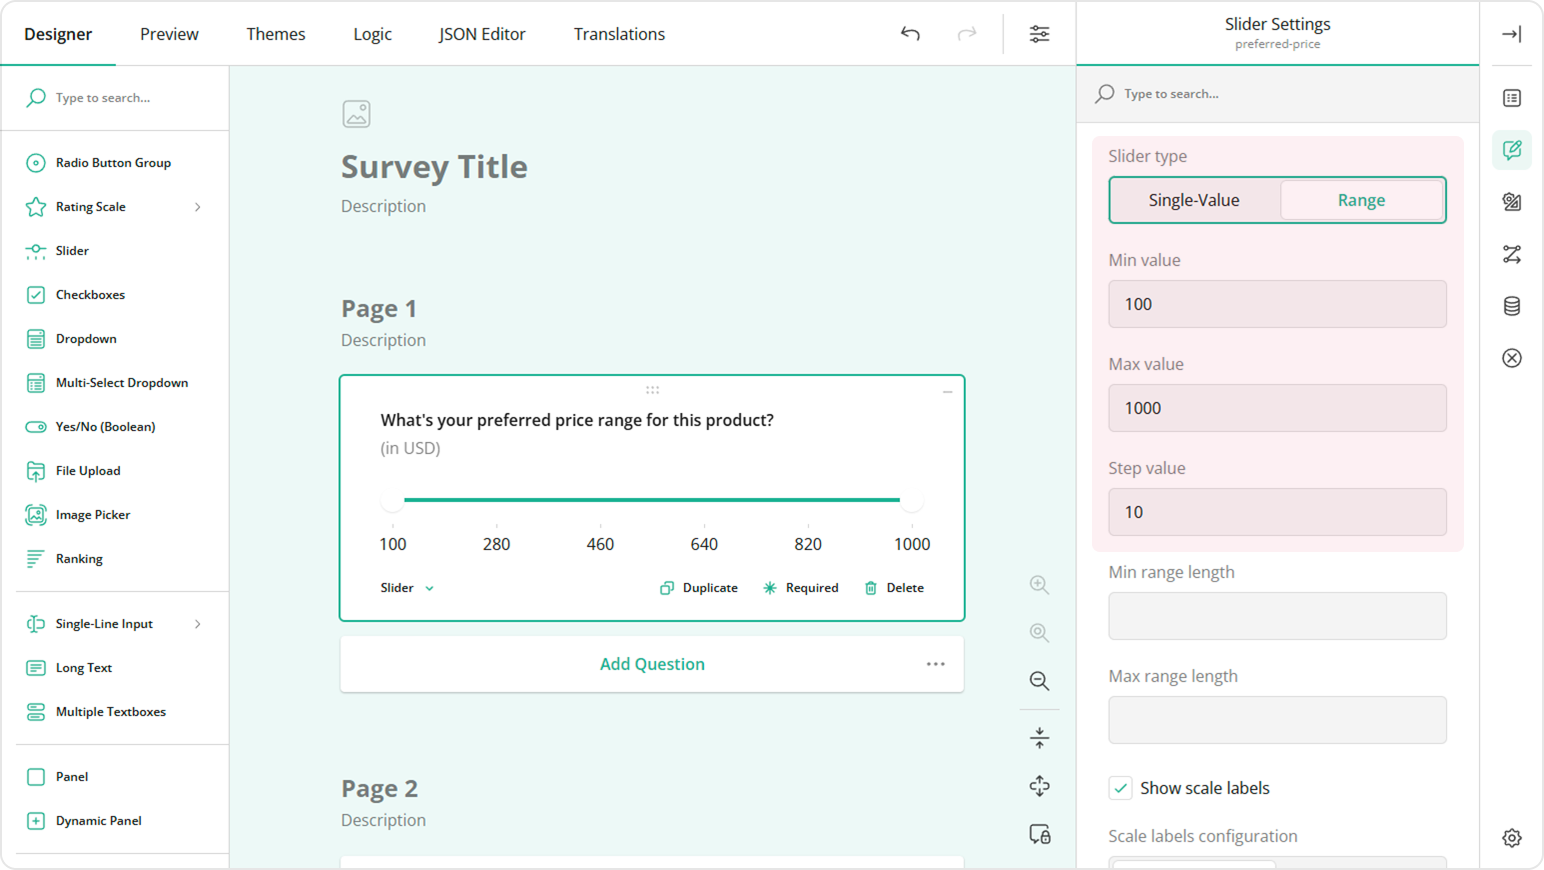
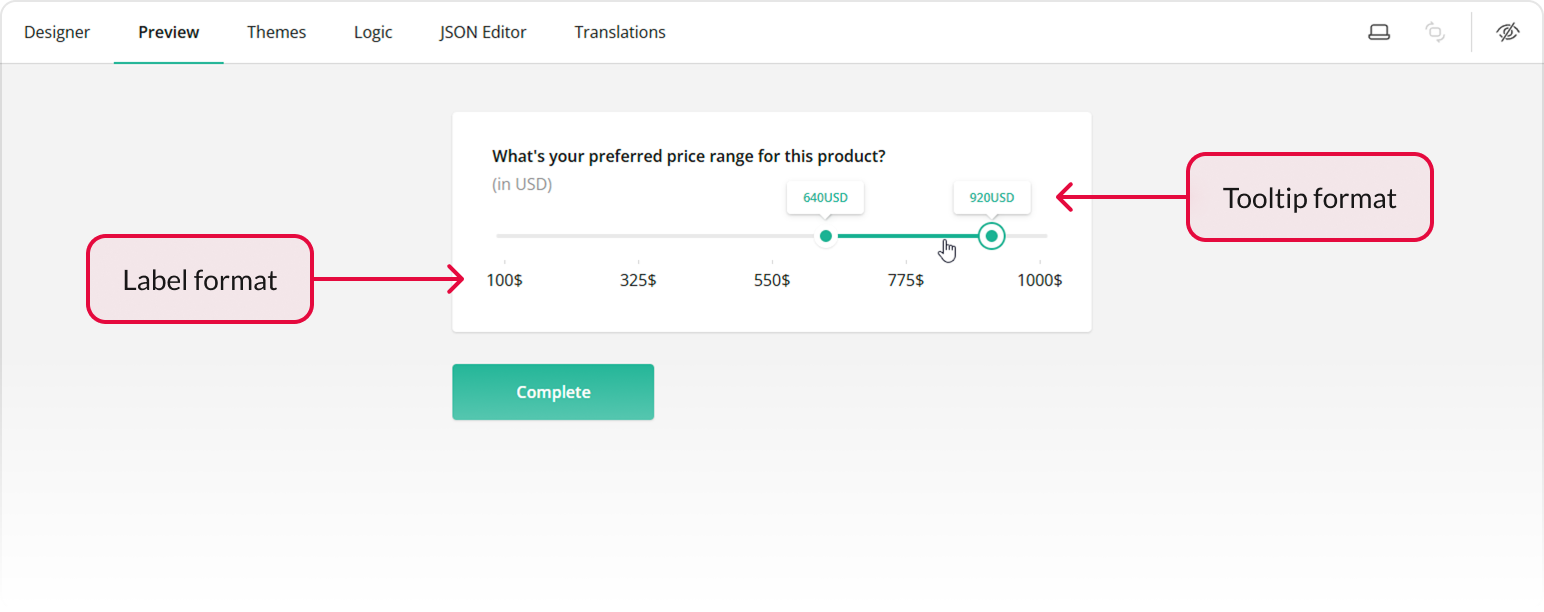
Adjust the Number of auto-generated scale labels (e.g. to
5) for a cleaner look.Optionally, customize the Label format and Tooltip format.
Enable Show the Clear button to allow users to clear their selection and start over.
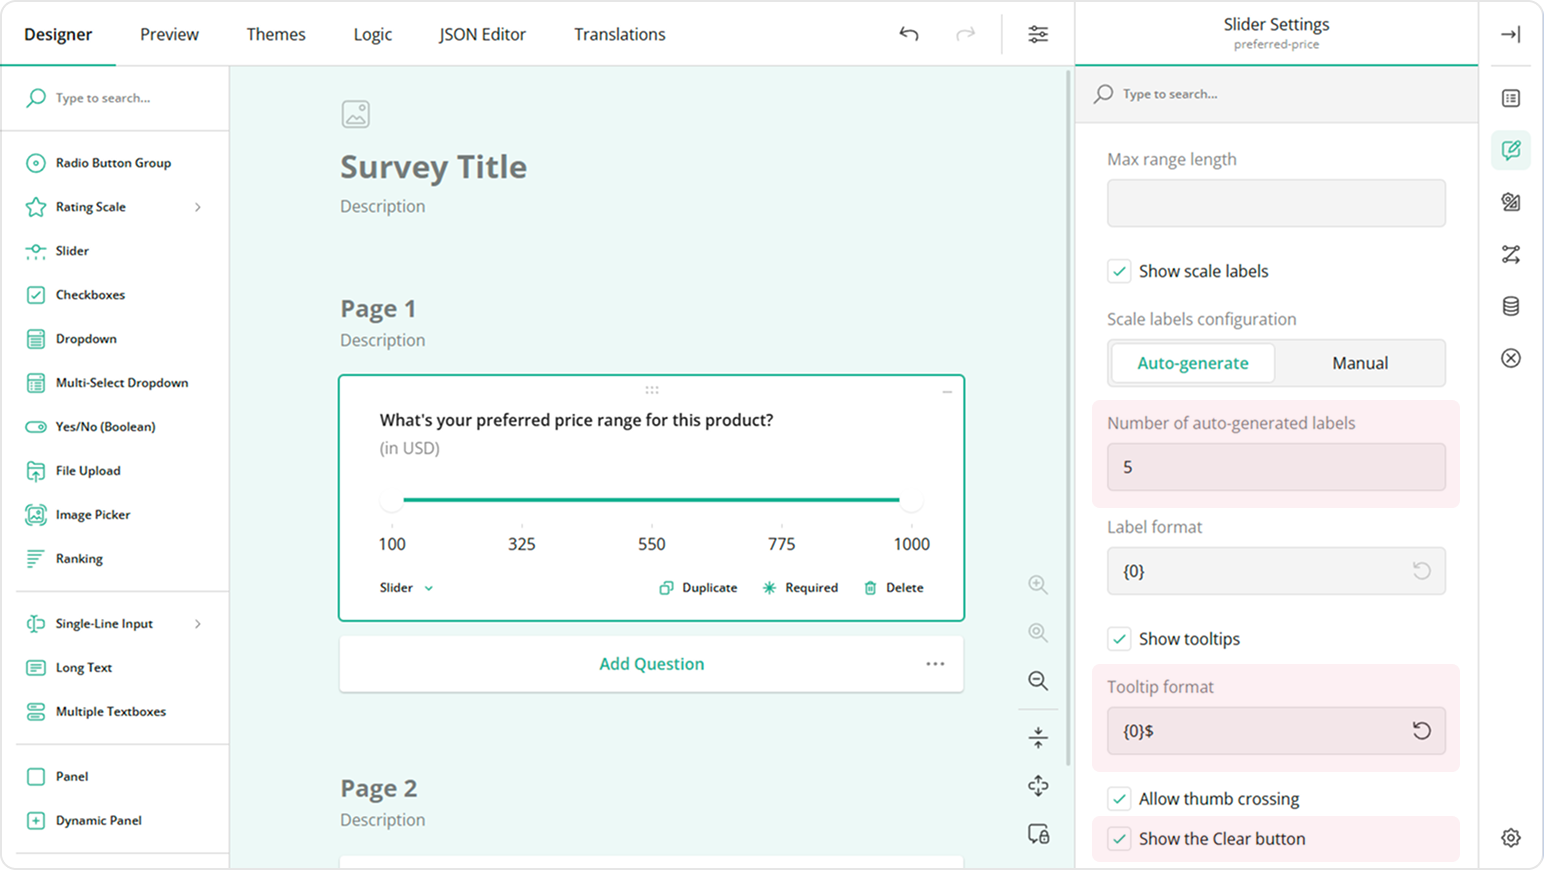
Limit the length of the selected range using the Min range length and Max range length settings. For example, if Max range length is set to
250, users cannot select a range where the distance between the slider thumbs exceeds 250 units.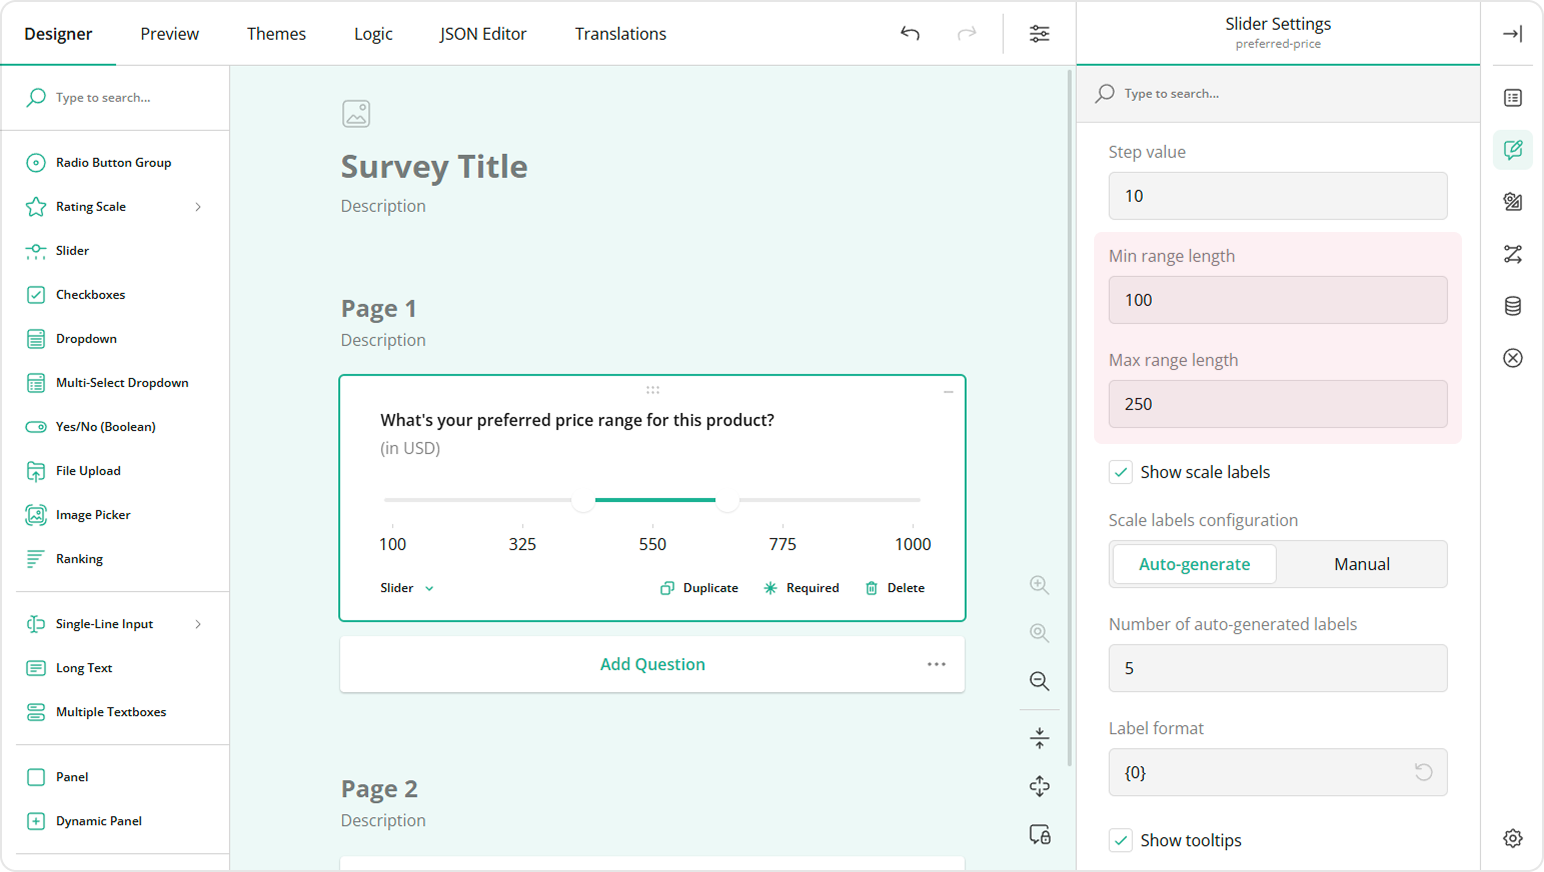
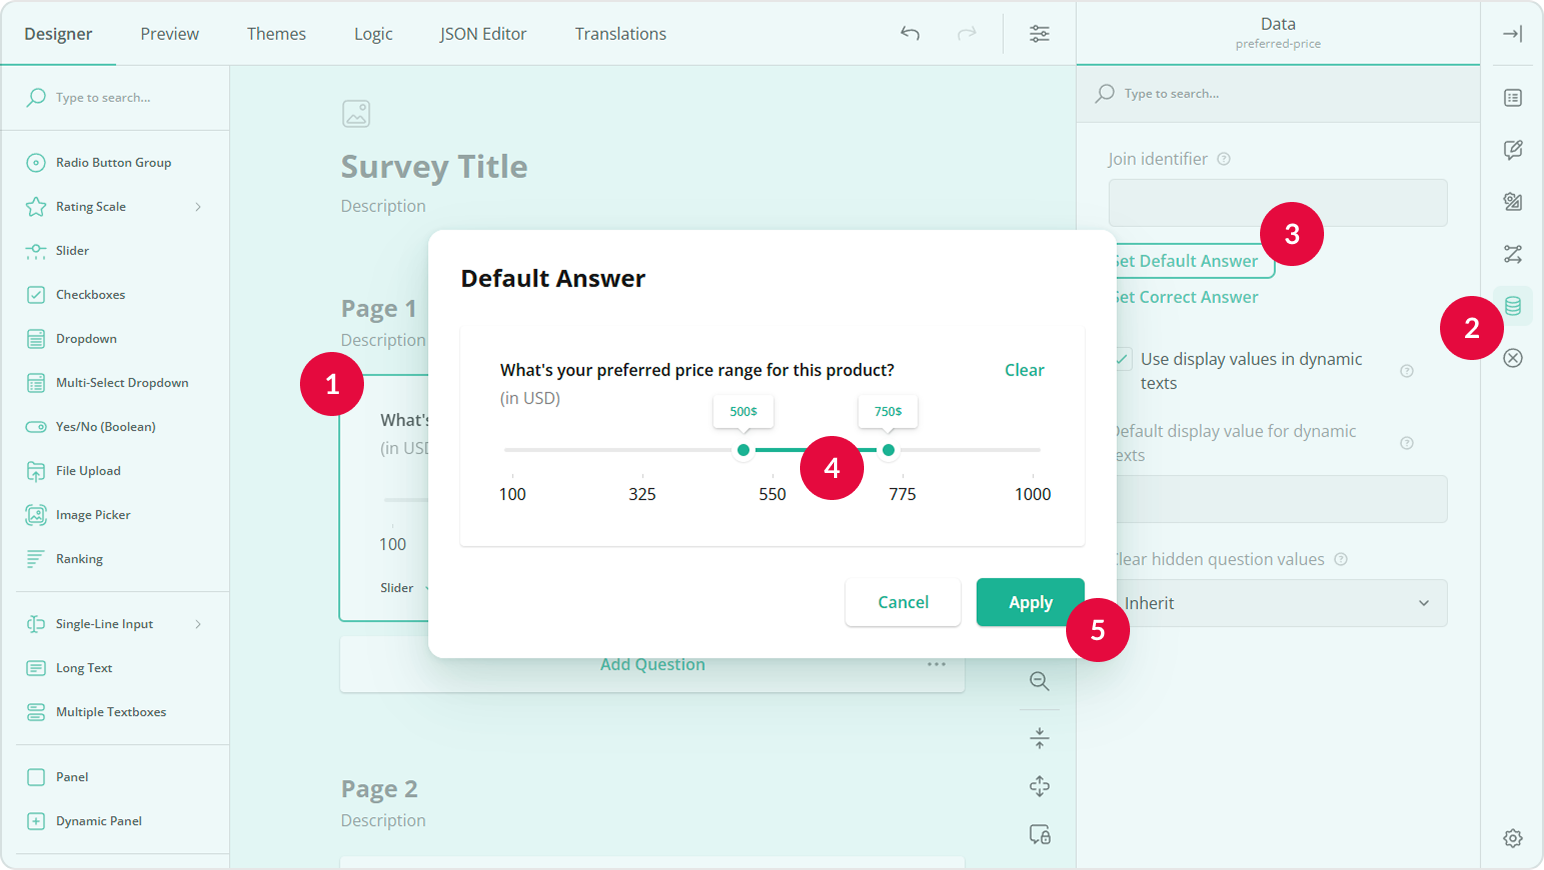
To set the initial positions of the slider thumbs, switch to the Data category and click the Set Default Answer button.
Drag the slider thumbs to the desired values (e.g.,
500and750) and click Apply.
Add an Input Field for the Minimum Value
Drag a Single-Line Input question onto your form.
Under General, give it a name (question ID), for example
min.Keep the Input type set to Text.
Set the Placeholder within the input field property to
Fromto indicate the minimum value.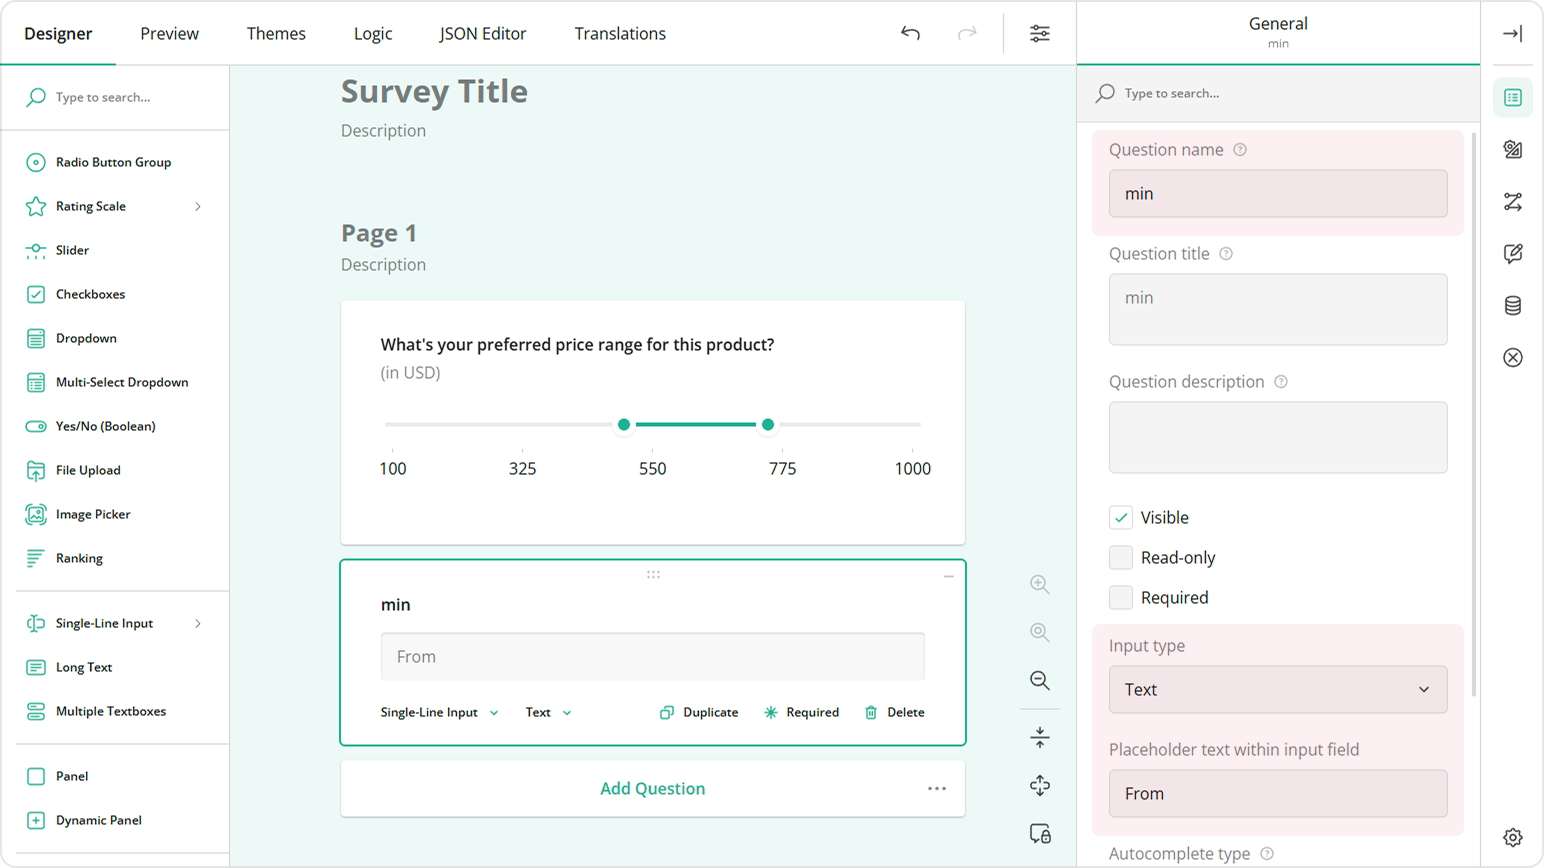
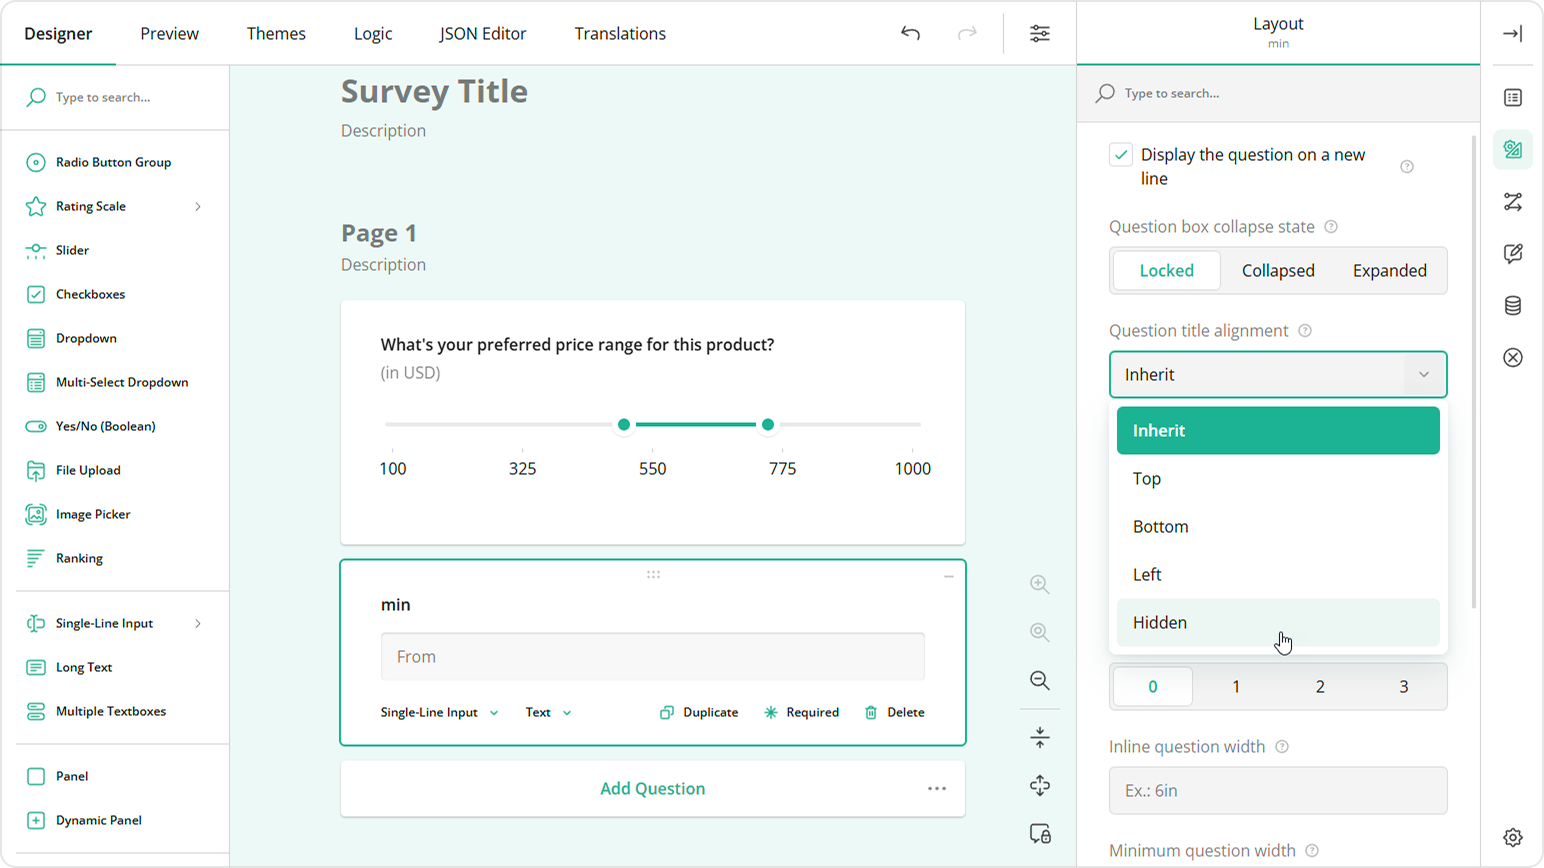
Under Layout, locate Question title alignment and set to Hidden.
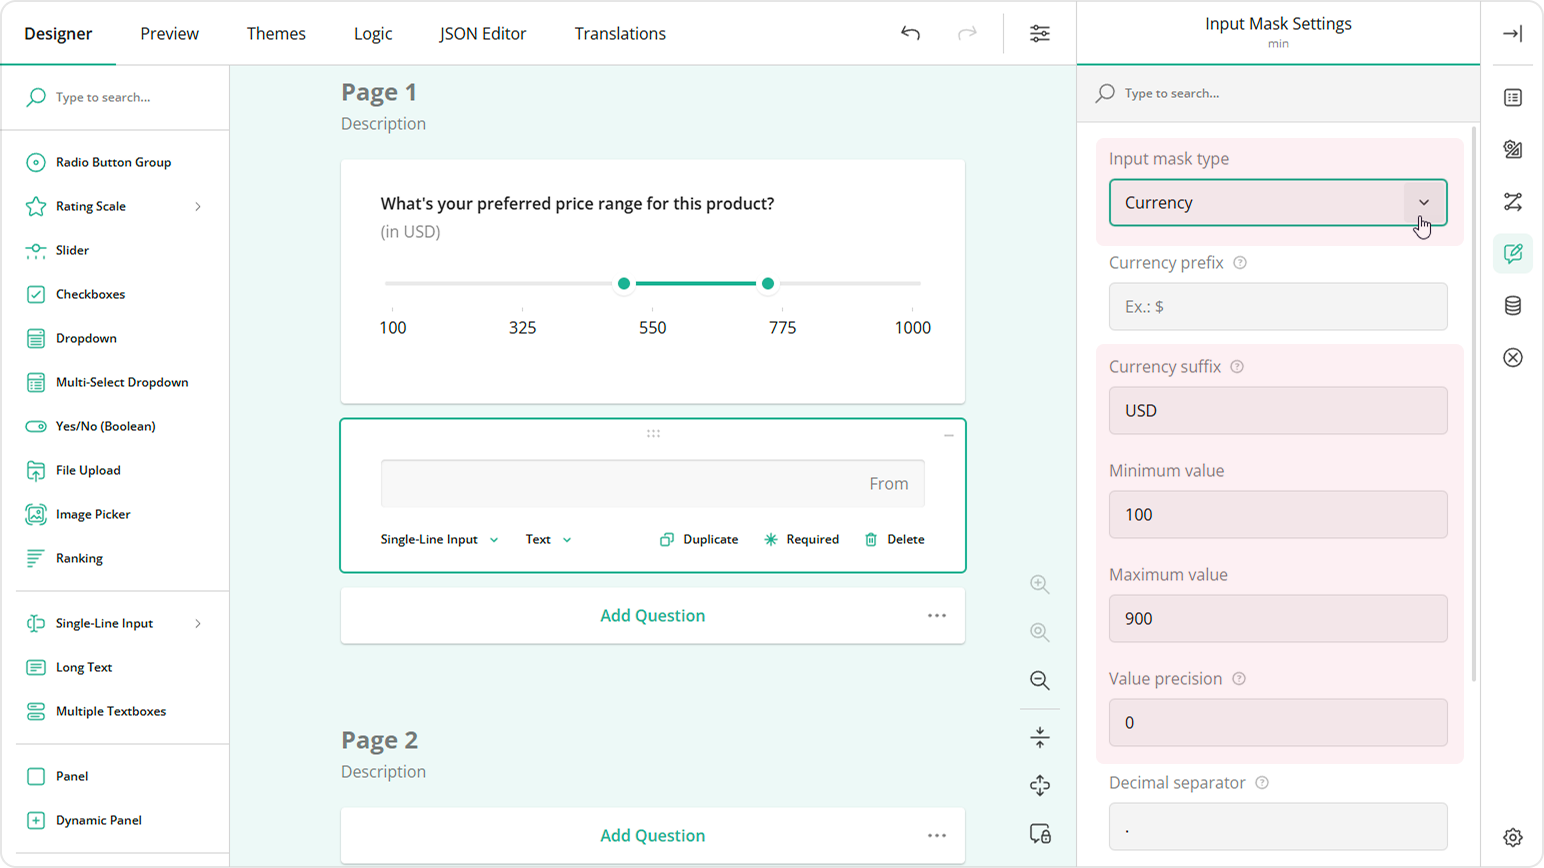
Switch to the Input mask settings category.
Select Currency as the input mask type.
Specify Currency suffix (e.g.,
USD).Set Minimum value to
100to match the Range Slider's Min value setting.Set Maximum value to
900(the difference between the values set for the Range Slider's Max value and Min range length settings).Set Value precision to
0to disable decimals.Disable the Allow negative values setting.
Add an Input Field for the Maximum Value
Duplicate the Single-Line Input question using the Duplicate button located on the question.
Place the new question to the right of the original one.
Assign a different name to it (e.g.,
max).Update the Placeholder within the input field to
To.Under Input mask settings category, set Minimum value to
200(since the Range Slider's starts at100and the Min range length property is set to100).Set Maximum value to
1000to match the Range Slider's Max value setting.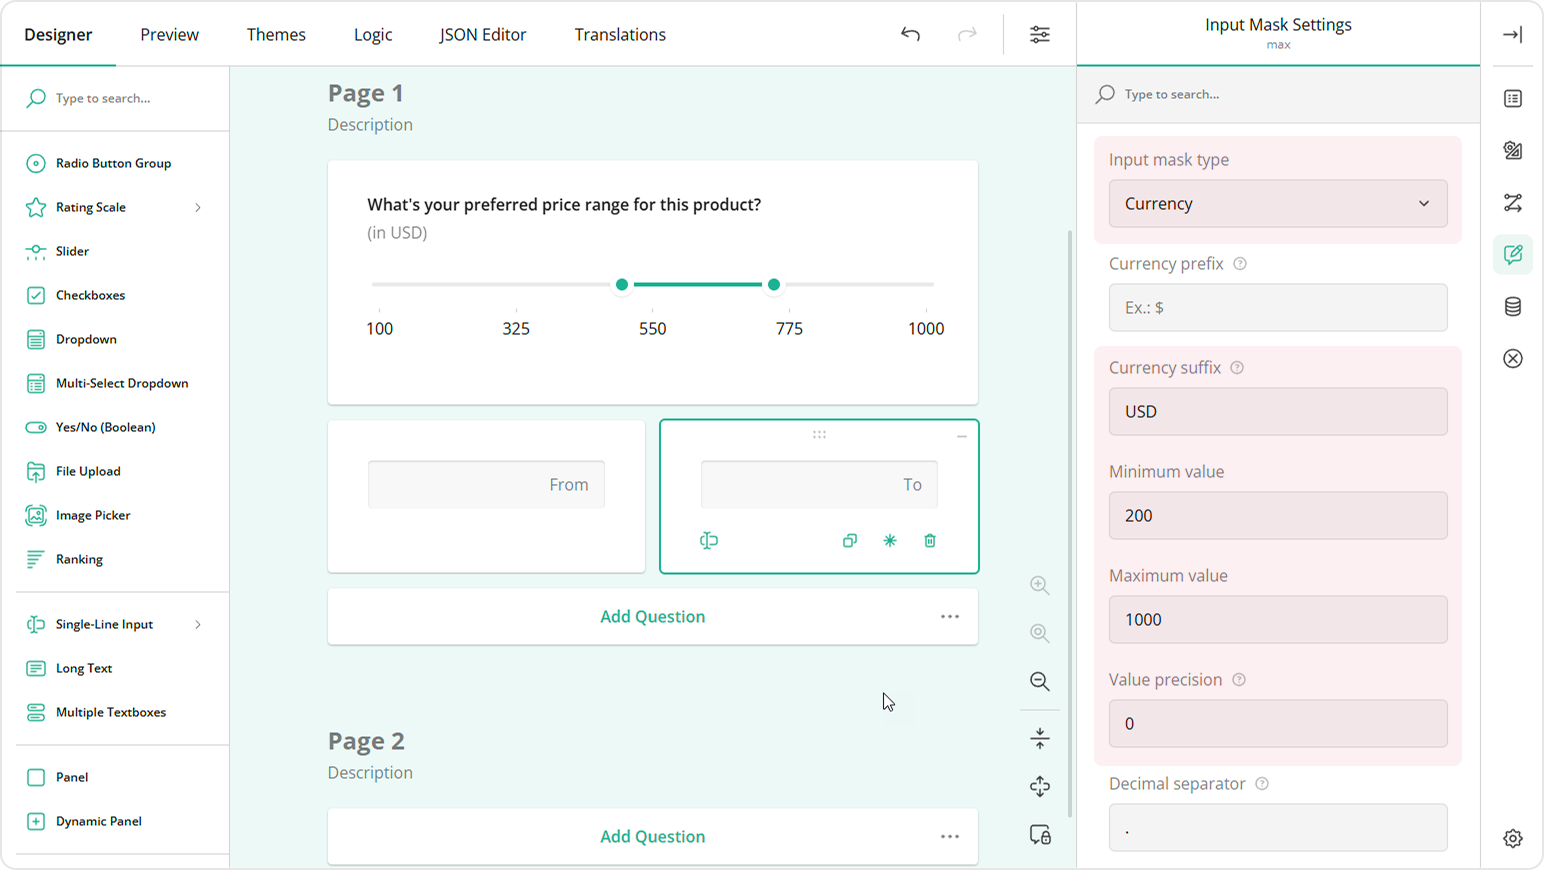
Sync the Slider with the Input Fields
Select the Range Slider question.
Under Conditions, locate the Set value expression field.
Enter the expression
[{min}, {max}], where values in curly brackets are the names of the Single-Line Input questions. This expression links the Range Slider's minimum and maximum thumb positions to the values entered into theminandmaxinput fields, respectively.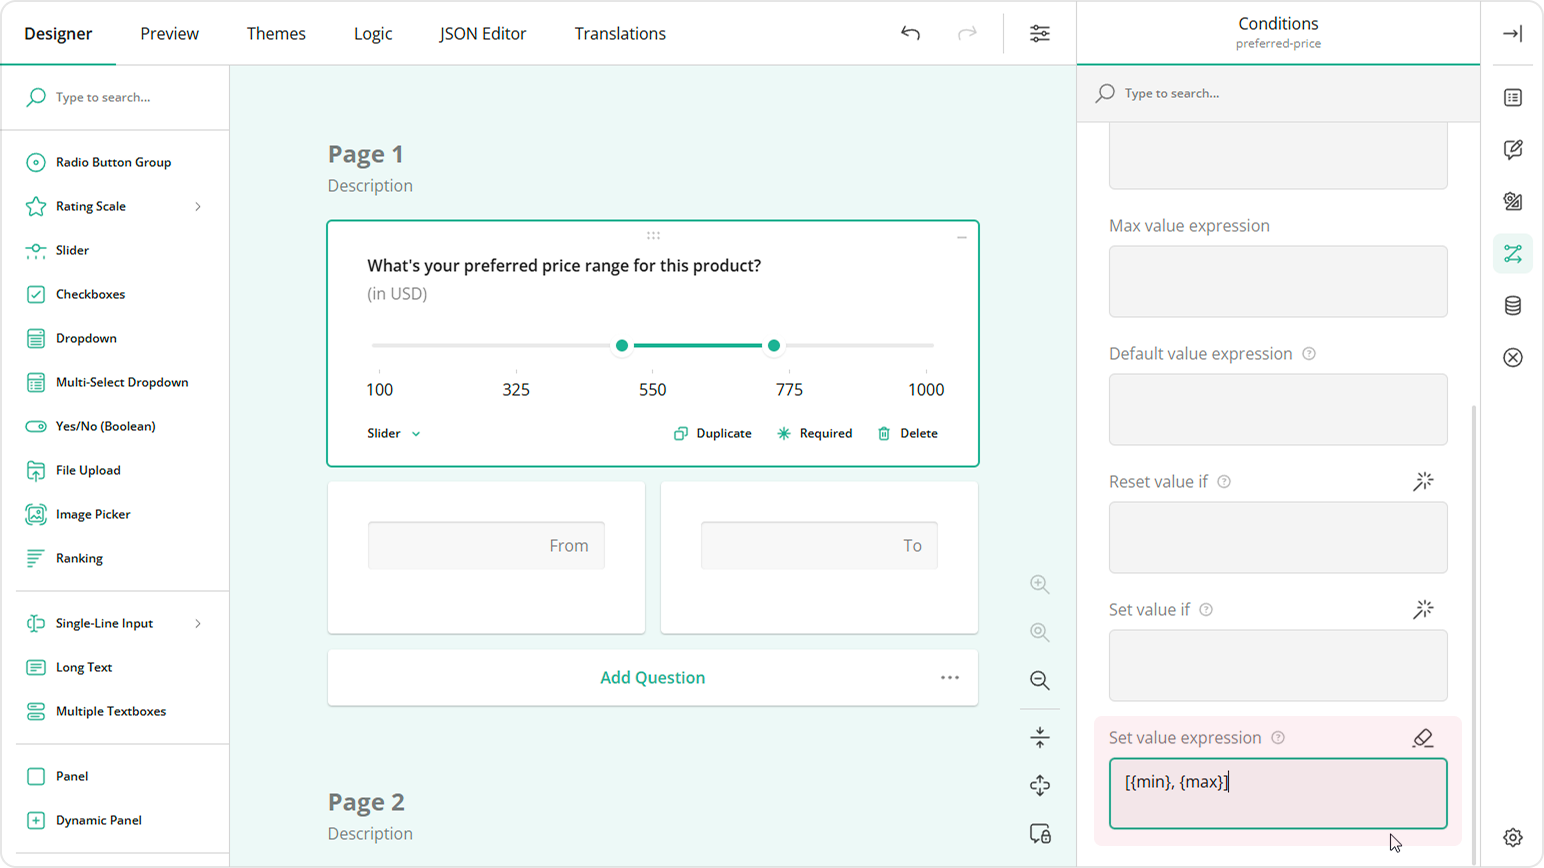
Select the
mininput field.Go to the Conditions category.
In the Set value expression field, enter
{preferred-price[0]}, wherepreferred-priceis the name assigned to the Range Slider question in step 2. This expression syncs the Range Slider's minimum thumb position with themininput field.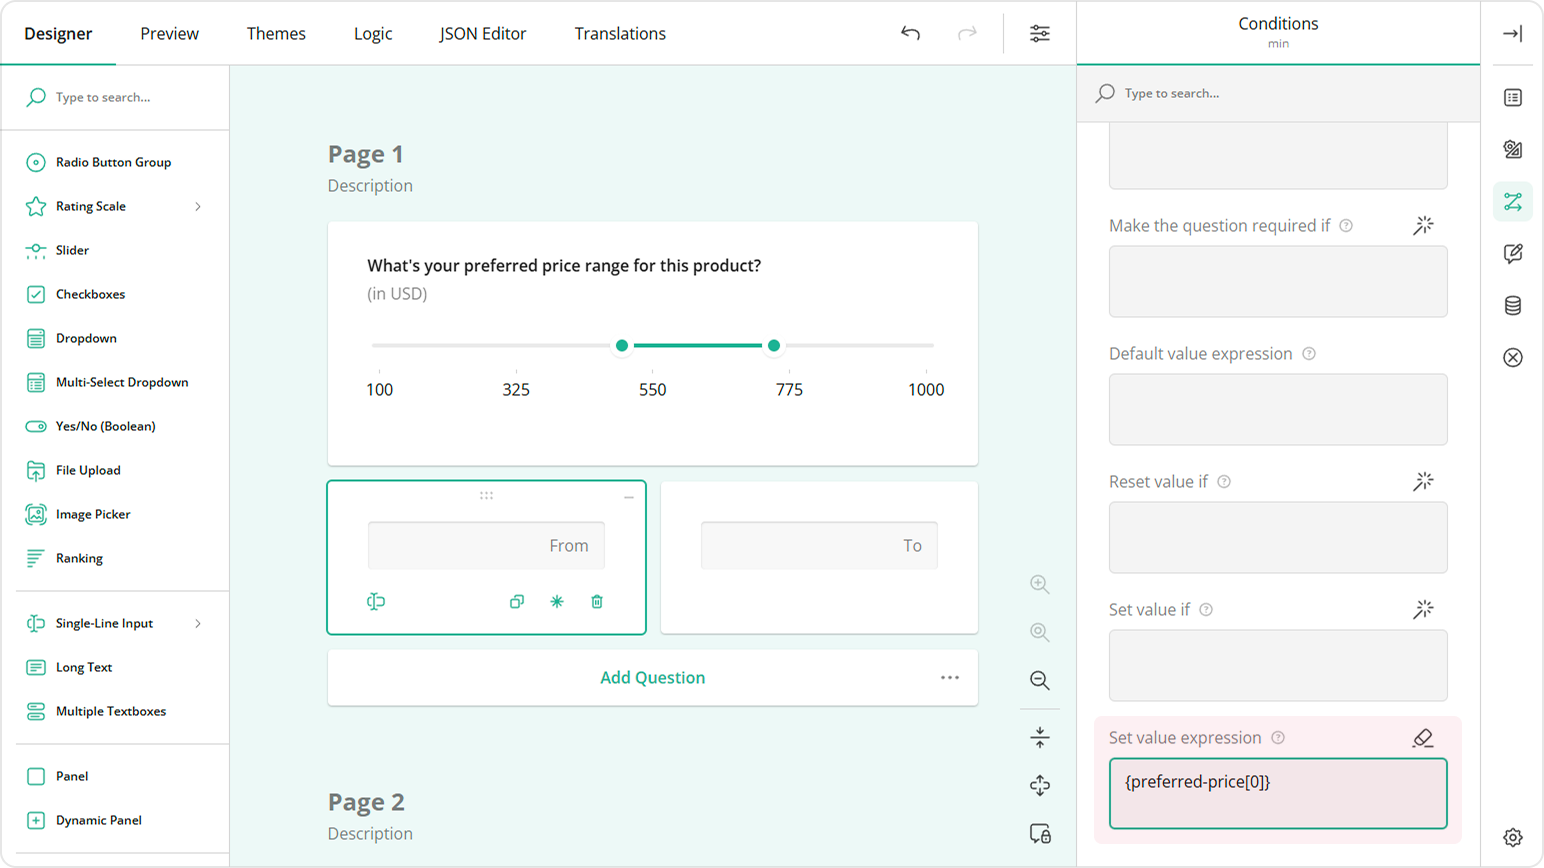
Select the
maxinput field.In the Set value expression field, enter
{preferred-price[1]}, wherepreferred-priceis the name assigned to the Range Slider question in step 2. This expression syncs the Range Slider's maximum thumb position with themaxinput field.
Add Validation for Manually Entered Values
Select the Range Slider.
Go to the Validation category.
Click the Plus icon to add a new validation rule.
In the Error message field, enter the text you wish to show if the values users enter in either input field don't meet the requirements (e.g.
The distance between the two slider values must be between 100 and 250.).In the Valid when field, enter the following expression:
{max} empty or {min} empty or ({max} - {min} <= 250 and {max} - {min} >= 100), where values in curly brackets refer to the names of the Single-Line Input questions. This expression ensures that the length of the specified range stays within the allowed limits when the range is defined externally.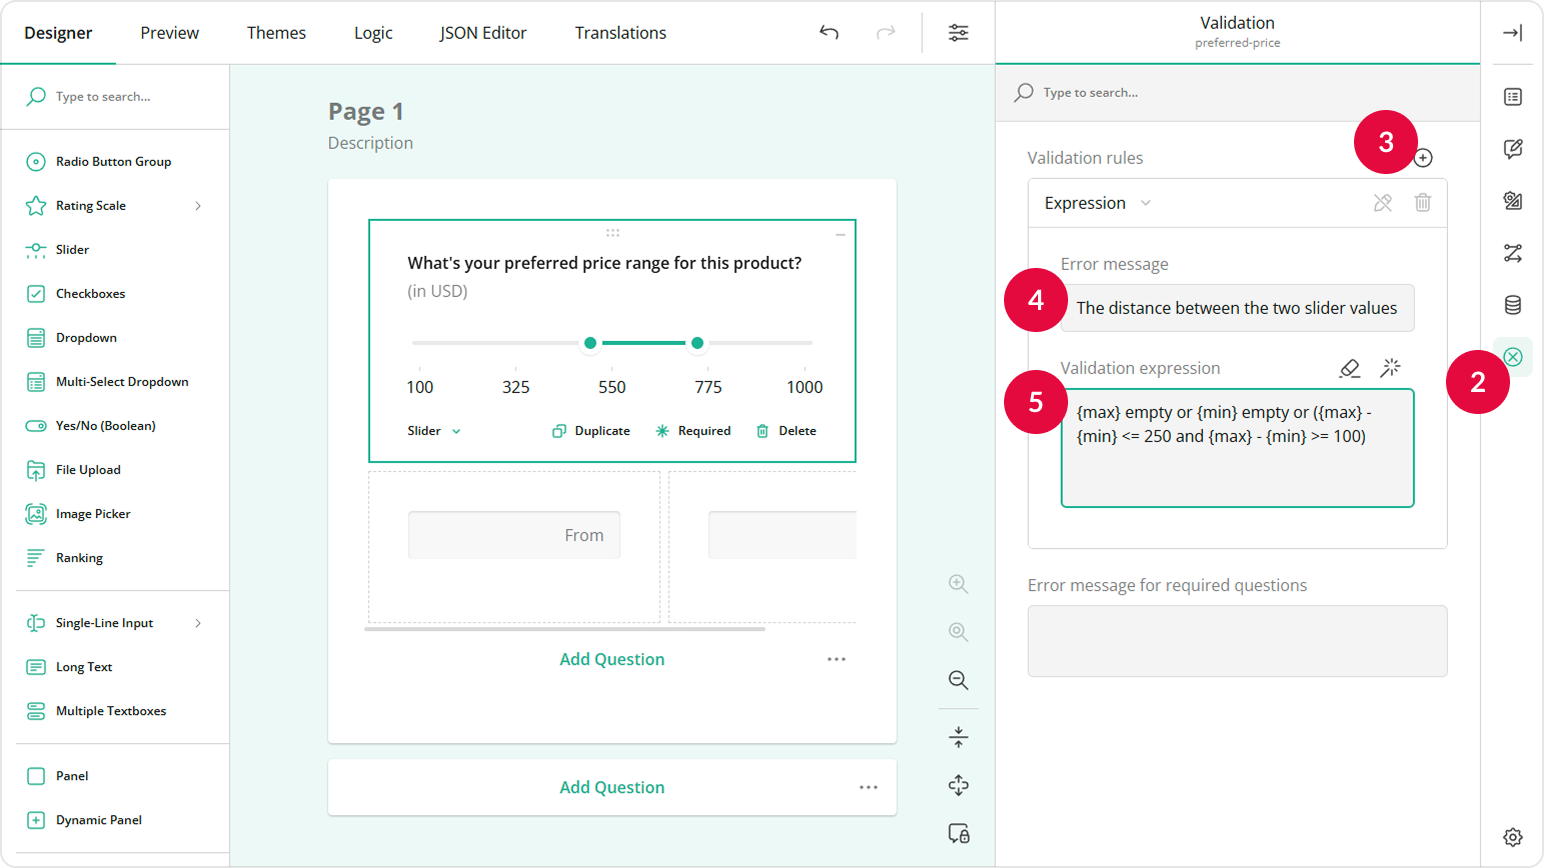
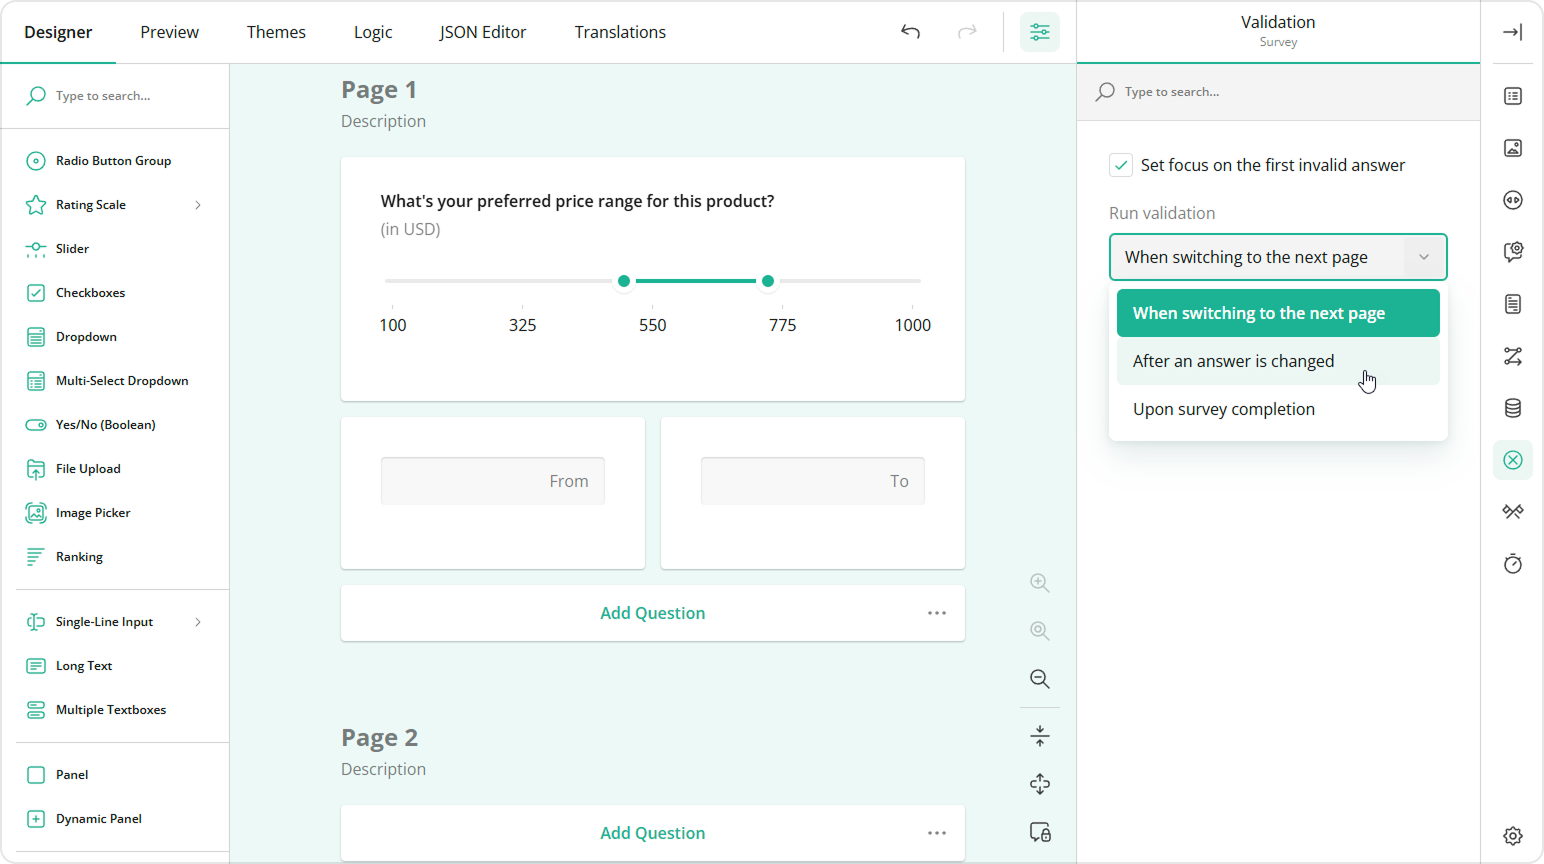
To ensure users are immediately informed of invalid values, enable immediate validation. Switch to the survey-level settings, open the Validation category, find the Run validation dropdown, and select the After an answer is changed option.
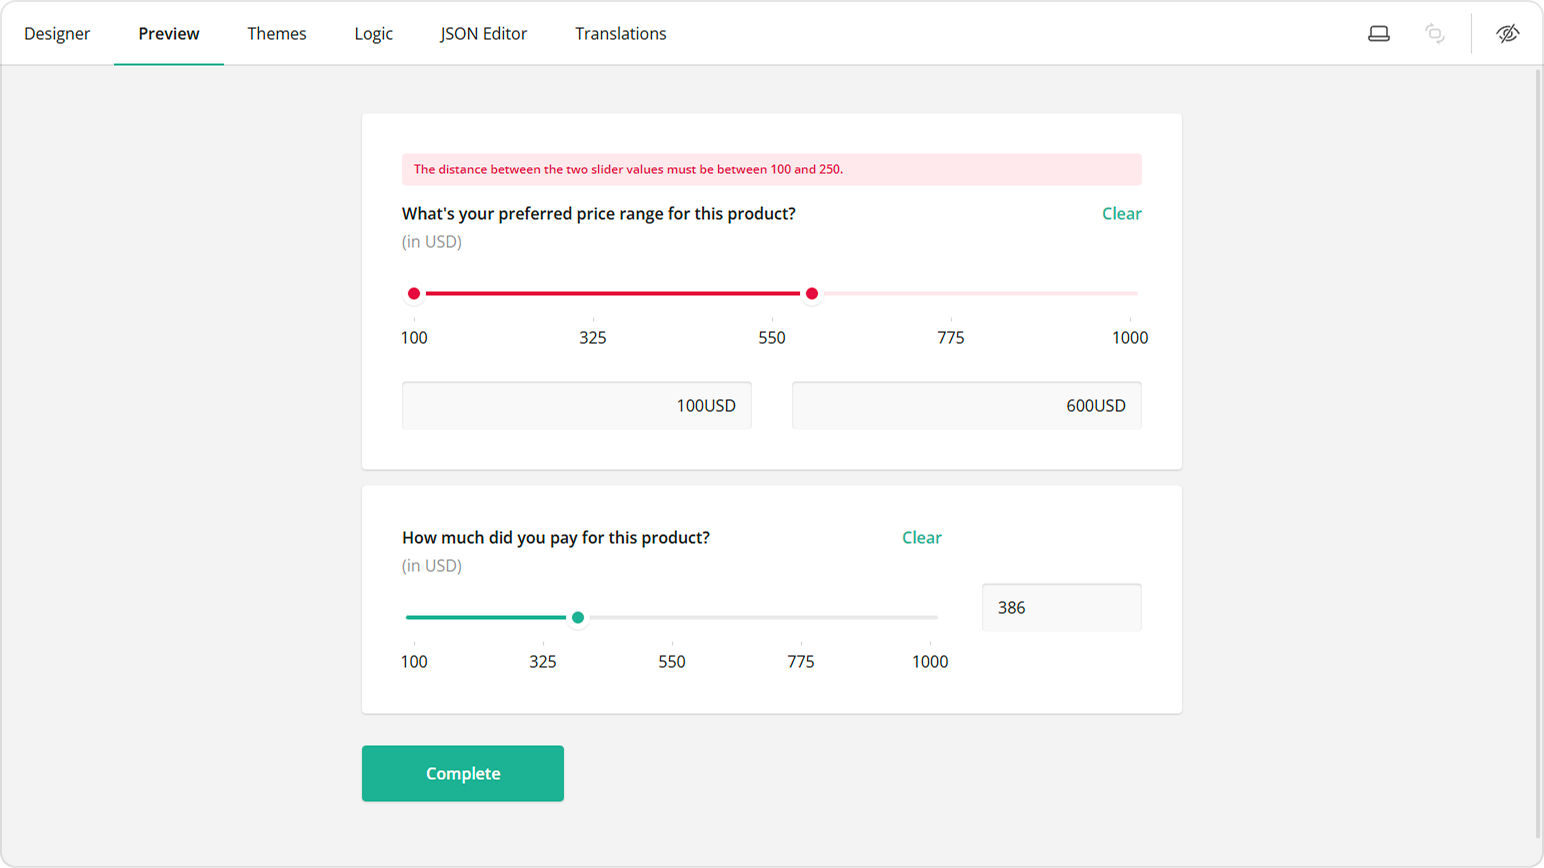
Now, if a user enters values that result in a range length less than 100 or greater than 250, the following error message will appear at the top of the Range Slider.
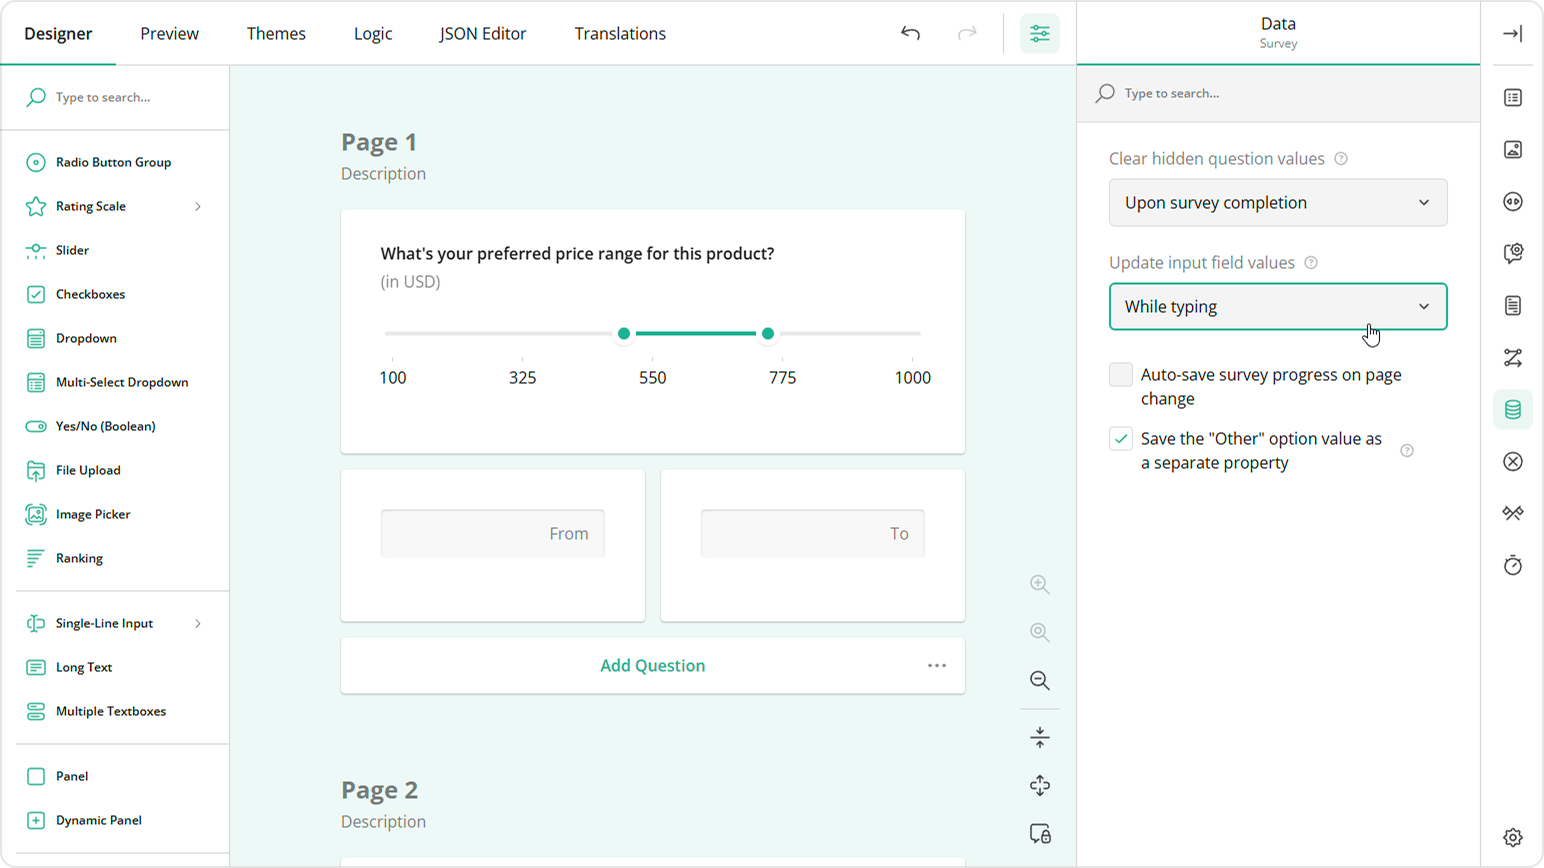
Enable Real-Time Data Updates
- While still on the survey-level settings, switch to the Data category.
- Locate the Update input field values property and set it to While typing to ensure that input fields update dynamically as users type.
Sync a Single-Value Slider with an Input Field
This section guides you through setting up a Single-Value Slider and linking it to a Single-Line Input question for manual value entry. To validate user input in the Single-Line Input field, we will configure the input format by setting the appropriate input type instead of applying an input mask.
Add a Single-Value Slider Question
- Drag a Slider question onto your form.
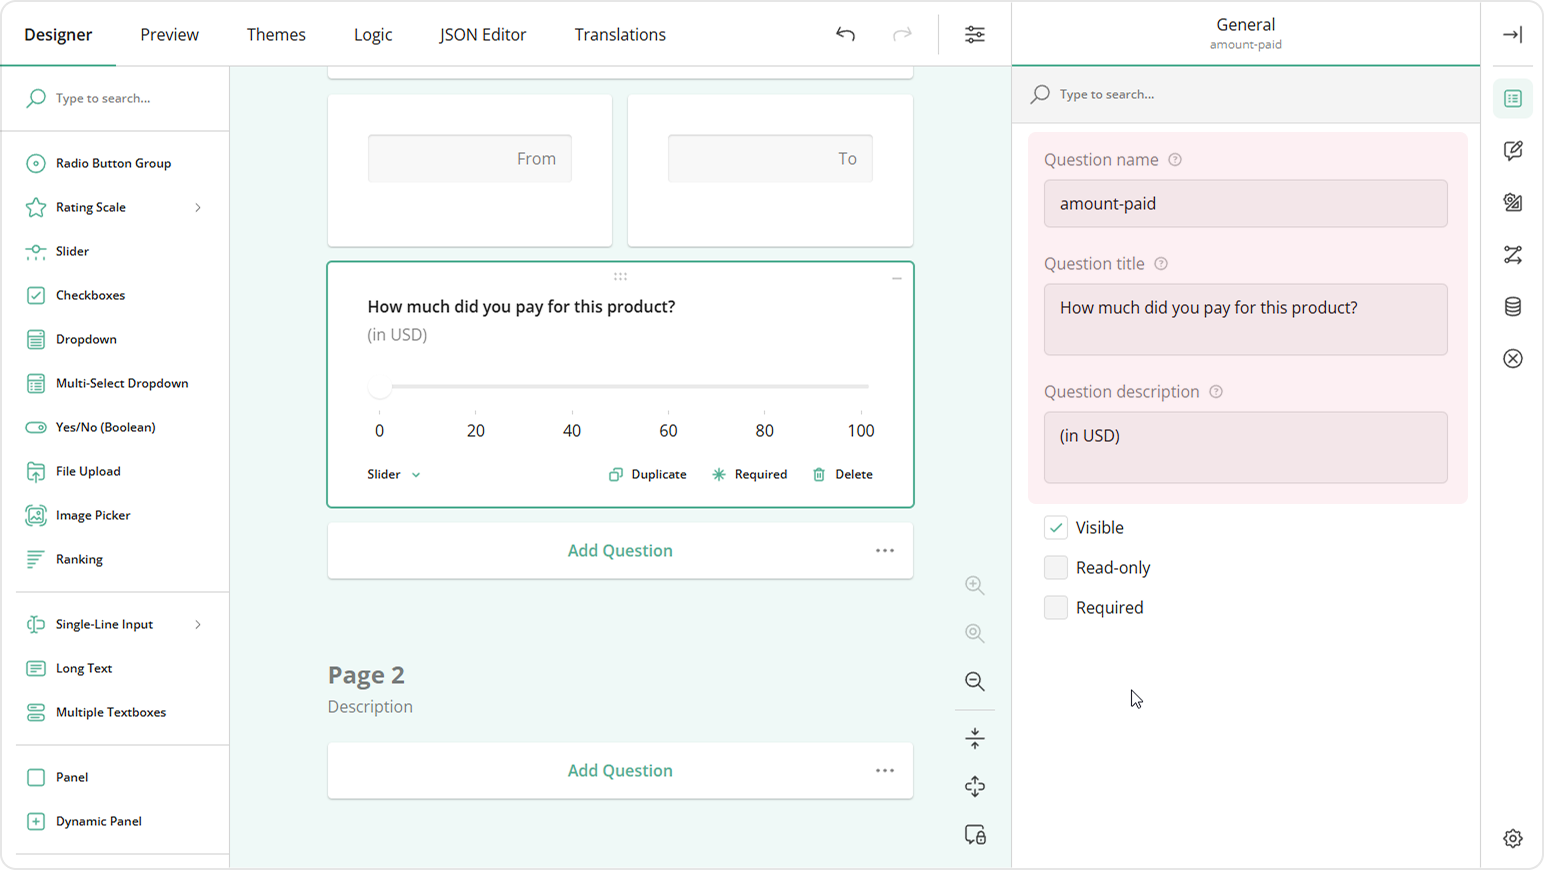
- Under General, give it a name (question ID, e.g.
amount-paid) and a user-friendly title (e.g.,How much did you pay for this product?). - Optionally, add a description (e.g.,
(in USD)).
Configure Single-Value Slider Settings
- Navigate to the Slider Settings category.
- Keep the Slider type property set to Single-Value to allow users to select just one value.
- Repeat Range Slider configuration settings.
Add and Configure the Input Field for Manual Data Entry
Drag a Single-Line Input question onto your form.
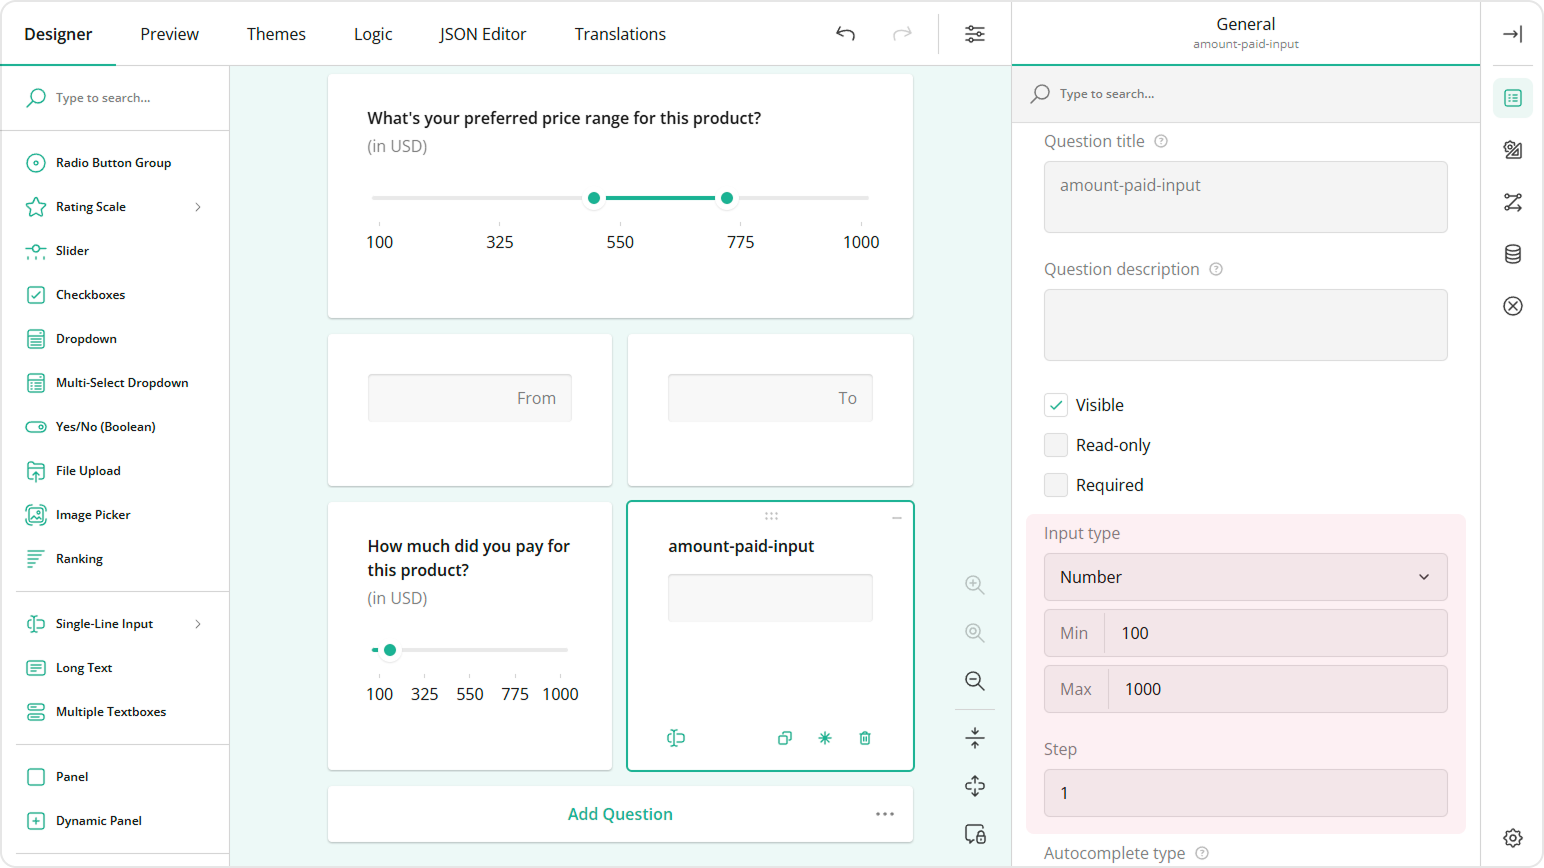
Under General, give it a name (question ID), for example
amount-paid-input.Change the Input type to Number.
Set the Min and Max properties to
100and1000respectively.Set the Step property to
1.
Under Layout, locate the Minimum question width property and set it to
200px.Locate the Maximum question width proeprty and set it to
20%.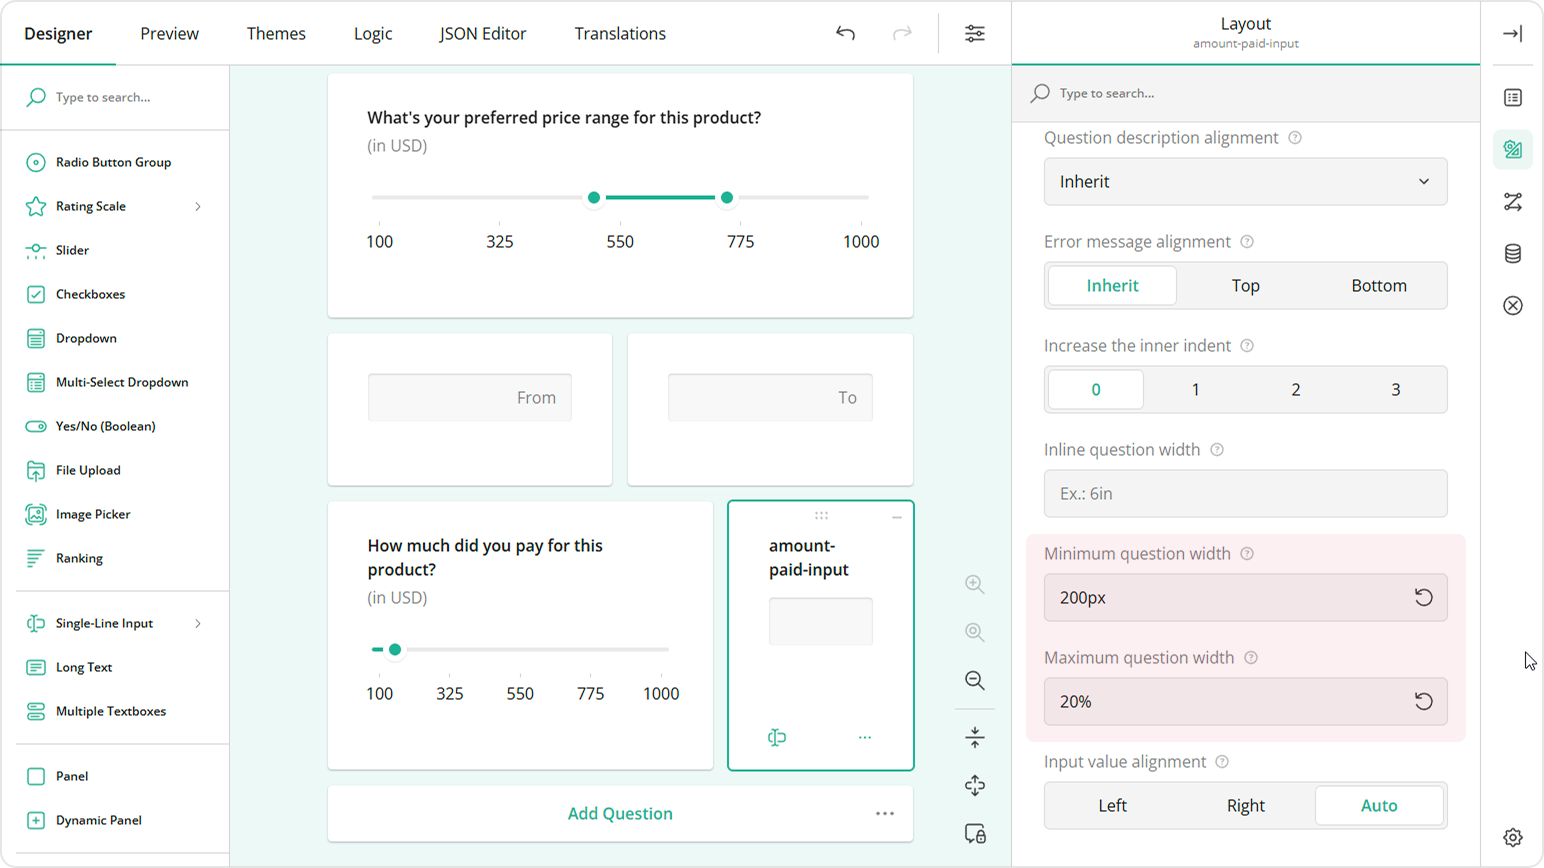
Go to the Data category, locate the Join identifier field, and enter the Single-Value Slider's name, i.e.
amount-paid, to ensure that the slider's and the input field's values are synchronized.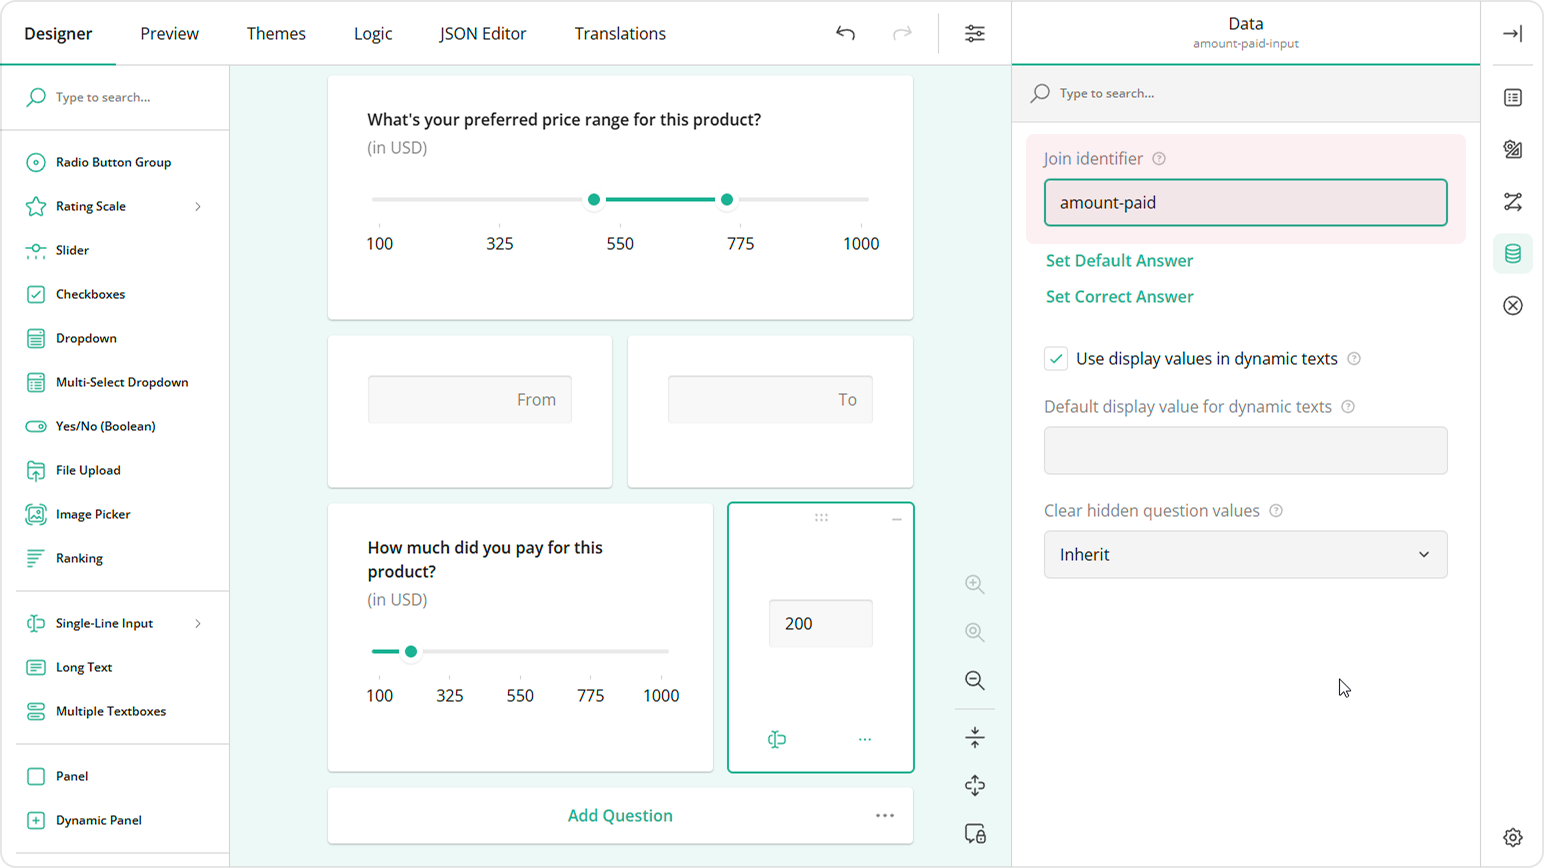
To vertically align the Single-Value Slider track with the input field, replace the auto-generated title of the Single-Line Input with a space (due to technical limitations, it cannot be empty). Optionally, you can place both questions in a Panel element to make them look as a unified element.
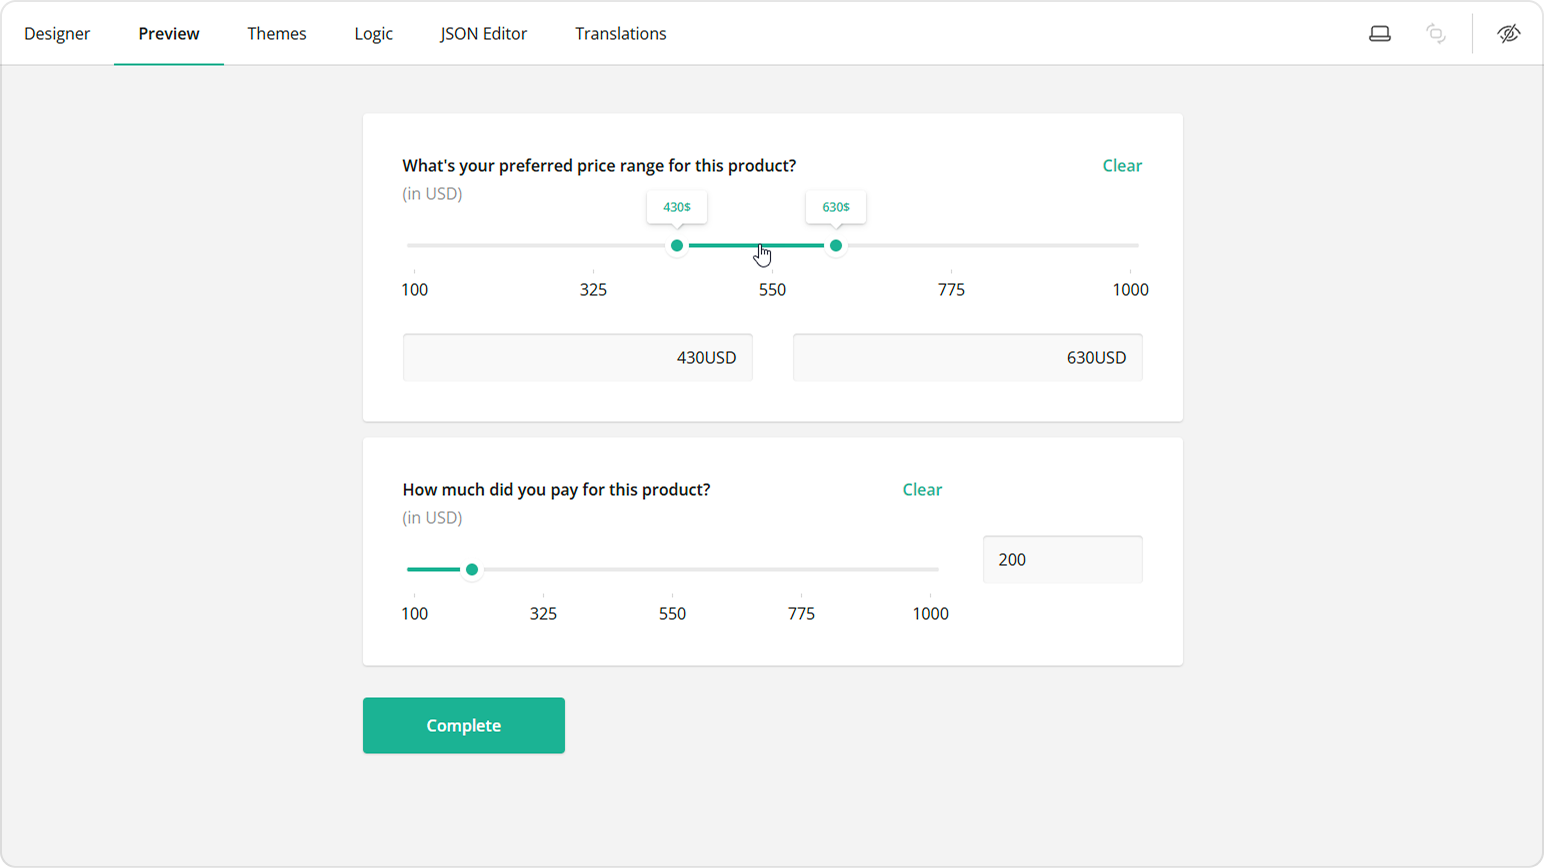
After completing the steps above, your form will display a UI like the one illustrated in the image below:
Send feedback to the SurveyJS team
Need help? Visit our support page